Last Updated: May 2026 | By Erdem Ugurluol | This article contains affiliate links. If you buy through them, I may earn a small commission at no extra cost to you.
You plug your dock in. Something doesn’t work. You unplug it, replug it, restart your Mac. Still not working. You Google the problem and end up buried in three-year-old Reddit threads that assume you’re on an Intel MacBook.
This guide is different. It covers every common docking problem on Apple Silicon Macs — M1 through M5 — with specific fixes for each one, organized by symptom. Start with the problem you’re seeing, follow the steps in order, and you’ll have it resolved in most cases without going near a terminal.
Before You Do Anything Else: The Fast Checklist
Run through this before diving into the specific problems below. It solves about 40% of dock issues in under two minutes.
- Unplug the dock cable from your Mac, wait 10 seconds, plug it back in. Power cycling the Thunderbolt/USB-C negotiation fixes a surprising number of issues.
- Check the cable. Not the dock, not the Mac — the cable between them. Use the cable that came with your dock. Random USB-C cables, even expensive ones, often don’t carry Thunderbolt at full speed or at all.
- Try a different port. MacBook Airs have 2 ports, most MacBook Pros have 3. Move the dock to a different port.
- Check if macOS needs an update. Apple → System Settings → General → Software Update. macOS updates frequently patch Thunderbolt and USB compatibility issues.
- Restart your Mac properly. Not sleep → wake. Full shutdown → start. This clears Thunderbolt controller state, USB controller state, and display handshake data.
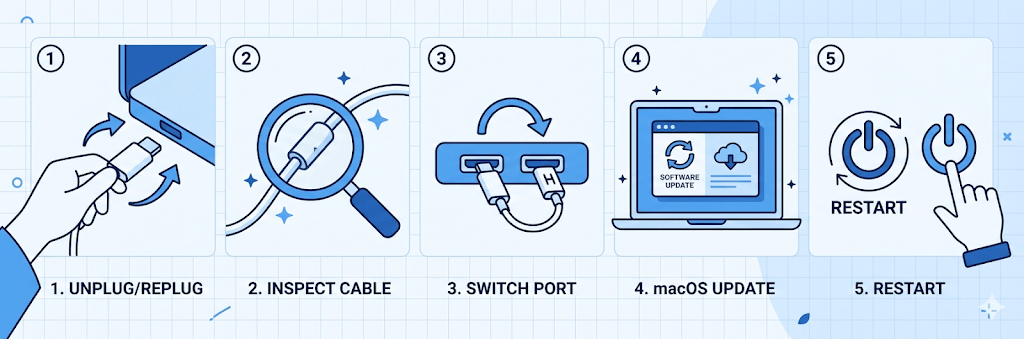
If these five steps don’t fix it, find your specific problem below.
Problem 1: Monitor Not Detected at All
The most common dock complaint by a wide margin. You connect the dock, plug in the monitor, and macOS shows nothing.
Step 1: Rule out the obvious first
Go to System Settings → Displays. If the monitor appears in the list but is switched off or sleeping, clicking “Detect Displays” in the bottom-right corner often wakes it.
If the monitor doesn’t appear in System Settings at all, it’s not being detected by the system — which points to the dock, cable, or connection, not the monitor.
Step 2: Test with a direct connection
Plug the monitor directly into your MacBook (using a USB-C to HDMI cable or USB-C to DisplayPort cable, bypassing the dock entirely). If the monitor works directly, the dock is the issue. If it doesn’t work directly either, your cable or adapter is the issue.
Step 3: Check the dock’s video connection type
Not all docks handle video the same way. There are three types:
- Thunderbolt docks — carry video natively through the Thunderbolt protocol
- USB-C docks with DisplayPort Alt Mode — pass the Mac’s video signal through the USB-C port
- DisplayLink docks — use software to compress and transmit video (requires driver installation)
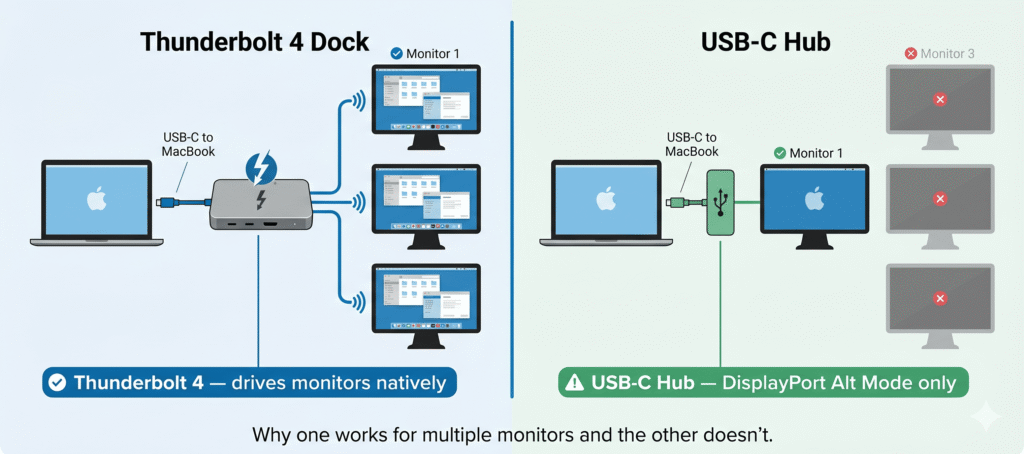
A basic USB-C hub connected via a port that doesn’t support DisplayPort Alt Mode will never output video, regardless of what you do. Check your dock’s spec sheet to confirm it explicitly supports video output.
Step 4: Check if your Mac supports the connection type you’re using
Some MacBook Ports only support data and charging — not video. On all current Apple Silicon MacBooks (M1 through M5), both USB-C ports support DisplayPort output. But on older Intel MacBooks with USB-A ports, not every USB-C port had DisplayPort Alt Mode. If you’re on an older Mac, check Apple’s tech specs page for your exact model.
Step 5: Check the cable between dock and monitor
The cable that runs from your dock to the monitor matters too. An HDMI 1.4 cable will fail at 4K above 30Hz. A DisplayPort cable that only supports version 1.2 will fail at high resolutions or refresh rates. Use HDMI 2.0 or higher for 4K at 60Hz, and DisplayPort 1.4 or higher for 4K at 144Hz.
Step 6: Security prompt on macOS Ventura and later
macOS Ventura (13) and Sequoia (15) added an accessory security feature. When you connect a new dock or device for the first time, a popup may appear asking for permission. If you dismissed it or clicked “Don’t Allow,” the dock’s video and data functions will be partially or fully blocked.
Fix: System Settings → Privacy & Security → scroll to the bottom → look for “Accessories” or “USB Accessories” — set it to “Allow.”
If the prompt never appeared, try disconnecting and reconnecting the dock while your Mac is unlocked and actively in use.
Problem 2: Only One Monitor Works (Instead of Two)
You’ve connected two monitors through a dock. One works perfectly. The other shows nothing, mirrors the first one instead of extending, or flickers off immediately.
This is the most misunderstood dock problem, and it’s almost never a dock defect. In the majority of cases, it’s a chip limitation.
The chip display limit — the real reason
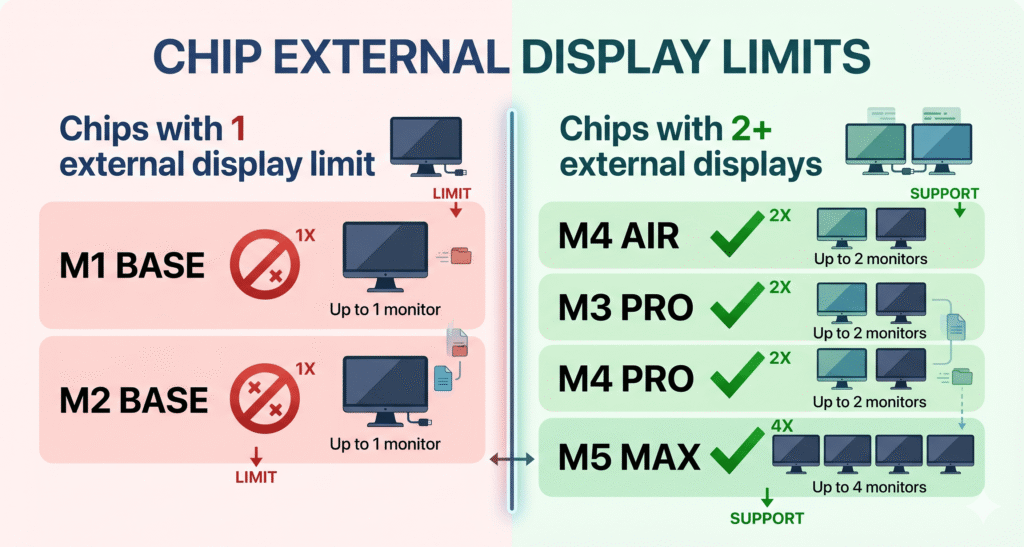
Affected models:
- MacBook Air M1 (2020): 1 external display max
- MacBook Air M2 13-inch (2022): 1 external display max
- MacBook Air M2 15-inch (2023): 1 external display max
- MacBook Pro 13-inch M1 (2020): 1 external display max
- MacBook Pro 13-inch M2 (2022): 1 external display max
- MacBook Pro 14-inch M3 base (2023): 1 external display with lid open / 2 with lid closed
- MacBook Air M3 (2024): 1 external display with lid open / 2 with lid closed
No dock — not a $400 CalDigit, not a $300 Plugable TB5 — can make these Macs drive two fully independent extended displays natively. The hardware in the chip itself has one display output allocated for external use. Connecting two monitors will result in the second one being mirrored or ignored entirely.
The fix for M1 and M2 Macs: You need a DisplayLink dock. DisplayLink bypasses the chip’s hardware display limit by using your CPU to process the video output instead. The second screen appears as a software-rendered display rather than a hardware-accelerated one. Install the free DisplayLink Manager app from Synaptics, grant Screen Recording permission, and the second monitor becomes available.
The fix for M3 Air and M3 MacBook Pro base: Close the lid. With the lid closed (clamshell mode), the display engine that was powering the built-in screen gets reassigned to drive a second external monitor. You need external keyboard, mouse, and power connected. This requires macOS Sonoma 14.6 or later.
For M4 Air and newer: Two external displays work natively. If they’re not working, the issue is elsewhere — most likely a USB-C hub instead of a Thunderbolt dock, or the wrong cable.
Still only showing one monitor? Check these
Mirroring is turned on: System Settings → Displays → select the second display → make sure “Mirror Displays” is unchecked. Sometimes macOS defaults to mirroring on first connection.
Using a basic USB-C hub, not a Thunderbolt dock: A USB-C hub can typically only carry one video stream. Even if it has two HDMI ports, they usually share a single DisplayPort signal and mirror each other. You need a Thunderbolt dock or a DisplayLink dock for genuinely independent extended displays.
The dock’s HDMI ports are sharing bandwidth: Some budget docks have two HDMI outputs but they’re on the same chip and can only mirror. Read the dock’s spec sheet carefully — look for “independent” or “extended” display support.
Problem 3: Dock Stops Working After Sleep
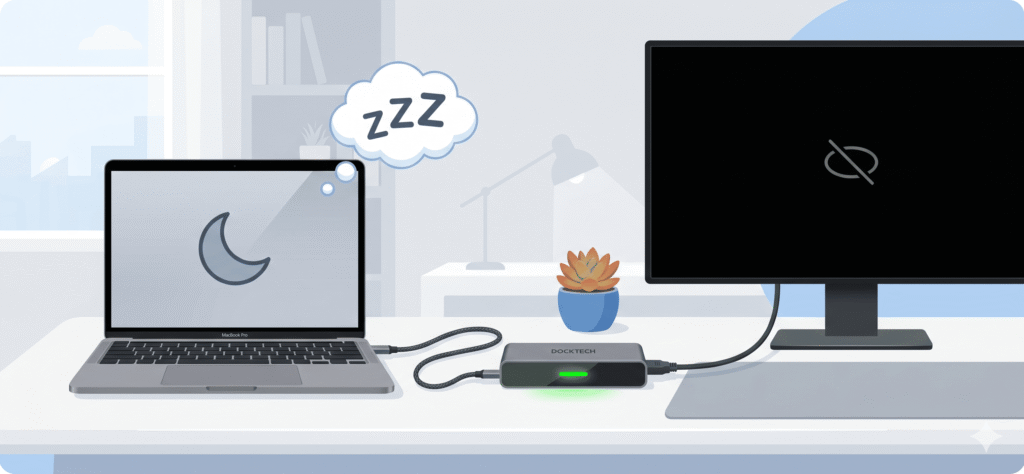
You close your MacBook or let it sleep. When you open it or wake it, the monitor stays black, the USB devices stop responding, or the dock behaves as if it’s been freshly plugged in. This is one of the most commonly reported issues with Apple Silicon Macs and docking stations.
Why this happens on Apple Silicon specifically
Apple Silicon Macs manage power aggressively. When your Mac enters sleep mode, it can power down the Thunderbolt controller and USB bus entirely — more completely than Intel Macs did. When it wakes, the Thunderbolt negotiation has to restart from scratch. If any part of that renegotiation fails or times out, the dock appears disconnected.
Fix: Change your Energy Saver settings
Go to System Settings → Battery (or Energy Saver) → uncheck “Enable Power Nap” and “Wake for network access.” These settings can interrupt the clean sleep/wake cycle that the dock negotiation depends on.
If you’re on a MacBook Pro that stays plugged in at your desk, also look for “Prevent automatic sleeping when the display is off” and enable it.
Fix: Set your display to never sleep separately from the Mac
System Settings → Displays → Advanced → uncheck “Prevent automatic sleeping on power adapter when the display is off.” Sometimes the display sleeping before the Mac does creates a broken state on wake.
Fix: Change the order of wake
When waking from sleep, try pressing a key on your external keyboard before touching the MacBook itself. On Apple Silicon Macs, waking via the Thunderbolt bus (external keyboard signal) sometimes produces a cleaner dock reconnection than waking via the MacBook’s own input.
Fix: Reset NVRAM
NVRAM stores display configuration and some sleep behavior settings. Resetting it clears stale data that can cause wake/sleep inconsistency.
On Apple Silicon Macs, shut down completely. Hold the power button for about 10 seconds until you see “Loading startup options.” Restart normally. This resets NVRAM on Apple Silicon.
On Intel Macs, restart and immediately hold Command + Option + P + R for about 20 seconds until you hear the startup sound twice.
Fix: Check for dock firmware update
Many docks have updatable firmware. CalDigit, OWC, Plugable, and UGREEN all release firmware updates that specifically address sleep/wake behavior. Check the manufacturer’s support page for your dock model. Firmware updates have fixed sleep/wake disconnection issues on several popular docks after macOS version updates.
If the problem started after a specific macOS update
This is common. Apple changes how the Thunderbolt and USB controllers interact with sleep in nearly every macOS release. If the problem appeared after a macOS update and was fine before it, check the manufacturer’s support forum for your dock. There’s often a known workaround or firmware fix within a few weeks of major macOS releases.
Problem 4: Monitor Flickering or Going Black Randomly
Your monitor is connected through the dock and works — but it flickers, flashes black briefly, or drops signal randomly. Sometimes it recovers on its own. Sometimes it stays black until you unplug and replug.
Check the cable first — it’s almost always the cable
The cable between your Mac and the dock, and the cable between the dock and your monitor, are both suspects. A cable that works for 90% of conditions will fail at high resolutions, high refresh rates, or when it heats up after an hour of use.
The cable between Mac and dock: use the Thunderbolt cable that shipped with your dock. If you’re using a third-party USB-C cable, replace it with a certified Thunderbolt 4 cable. Random USB-C cables are the #1 cause of intermittent dock signal issues on Mac.
The cable between dock and monitor: if using HDMI, try switching to DisplayPort if your monitor supports it. macOS handles DisplayPort more reliably than HDMI for high-resolution or high-refresh setups. If you’re at 4K 60Hz with an HDMI 2.0 cable, confirm the cable is rated HDMI 2.0 — HDMI 1.4 cables will fail at 4K@60Hz, often intermittently rather than completely.
Cable length matters: For Thunderbolt 4, passive cables maintain full bandwidth up to 2 meters. Beyond 2 meters, you need an active cable. For Thunderbolt 5, passive cables are reliable up to about 1.2 meters. A cable that’s borderline too long for your setup may work most of the time but fail under load.
Turn off HDR and variable refresh rate on the monitor
macOS toggles between SDR and HDR mode dynamically when HDR is enabled on an external display. This toggle can cause a black flash as the display renegotiates. Similarly, variable refresh rate (VRR) can cause instability on some monitor/Mac combinations.
System Settings → Displays → select your external monitor → turn off HDR → set a fixed refresh rate (60Hz or 120Hz, not “ProMotion” or “variable”). Test for 24 hours.
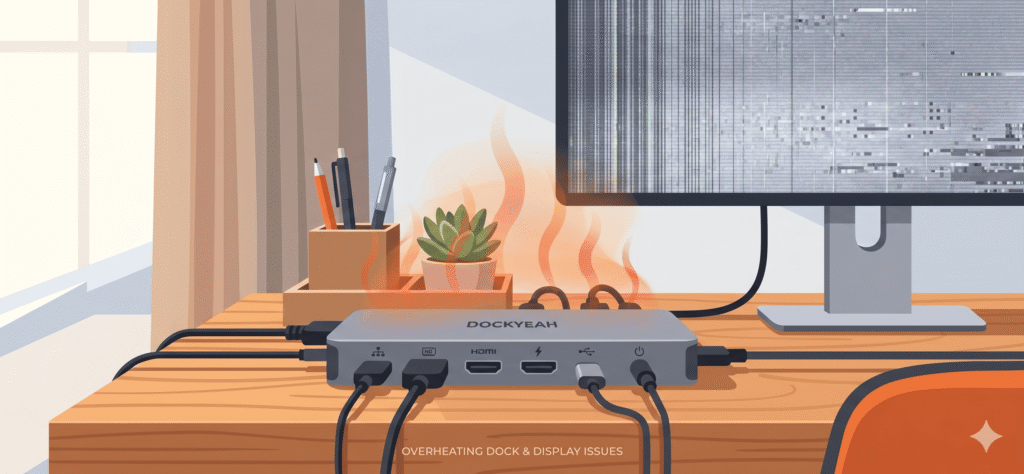
Check if the dock is overheating
A dock that runs hot will throttle its output to protect itself, which can cause video signal drops. Pick up the dock after an hour of use. If you can’t hold it comfortably for 3 seconds, it’s running hot.
Make sure the dock has clear airflow around it — don’t stack it under other devices or put it in a drawer. Some docks need to be laid flat rather than stood vertically to dissipate heat effectively. If the dock runs hot even with good airflow, that’s a sign of a failing or underpowered unit.
For DisplayLink docks: check driver version
If you’re using a DisplayLink dock (which you need for dual monitors on M1/M2 Macs), an outdated DisplayLink Manager driver can cause flickering, especially after macOS updates. Go to the Synaptics DisplayLink website, download the latest DisplayLink Manager for macOS, install it, and restart.
Also check that Screen Recording permission is granted for DisplayLink Manager: System Settings → Privacy & Security → Screen Recording → make sure DisplayLink Manager is toggled on. If it’s off, DisplayLink displays go blank or flicker.
Problem 5: MacBook Charges Slowly Through the Dock
Your MacBook is plugged in via the dock but the battery isn’t charging at full speed — or it’s actually draining slowly while connected.
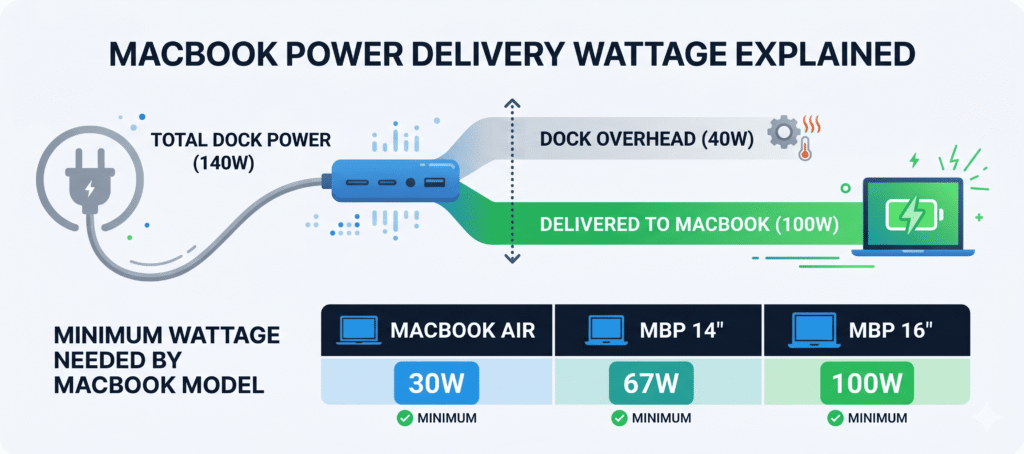
Understand the power delivery chain
A dock advertises, say, 100W total output. But that 100W has to power the dock itself — its Ethernet chip, USB controller, display outputs, and connected devices — before any remaining wattage reaches your MacBook. A dock that claims 100W might deliver only 60–70W to the laptop after powering everything else.
Minimum charging requirements by Mac model:
- MacBook Air (any M chip): 30W minimum, 67–70W for normal charging
- MacBook Pro 14-inch: 67W minimum, 96W for full-speed charging
- MacBook Pro 16-inch: 100W minimum via USB-C, 140W for full-speed charging (MagSafe preferred)
If your dock delivers less than these minimums, the Mac won’t charge — or will charge so slowly that active use drains the battery faster than the dock refills it.
Check what your dock actually delivers to the laptop
The advertised wattage is total output, not what the laptop receives. To find out what’s actually being delivered, look at System Information: Apple menu (hold Option) → System Information → Power → look at “Wattage” under the charger section.
If this shows a number significantly lower than your dock’s rated output, the dock is either underpowered or your connected peripherals are consuming most of the power budget.
Fix: Use MagSafe alongside the dock for 16-inch MacBook Pro
The 16-inch MacBook Pro needs up to 140W for full-speed charging under load. Most docks can’t deliver this via USB-C alone. The cleanest solution: plug MagSafe into the Mac for charging, and use the dock purely for data and display. This is exactly what MagSafe is designed for on MacBook Pros.
Fix: Disconnect bus-powered devices during charging
Bus-powered devices (external SSDs, older hard drives, some monitors) draw power from the dock. If you have several connected at once, the dock may not have enough left to charge your Mac at full speed. Temporarily disconnect non-essential bus-powered devices and check if charging improves.
Fix: Replace a charging-only USB-C cable
Some USB-C cables only support Power Delivery (charging) — they don’t carry data or Thunderbolt at all. These are typically the thin, flat cables that come with phone chargers. If someone’s using one of these between a dock and a MacBook Pro, the Mac will charge (potentially at limited wattage) but data and video won’t work. Always use the cable that shipped with your dock.
Problem 6: USB Devices Not Working Through the Dock
Keyboard, mouse, external drive, or other USB devices connected through the dock stop being recognized. The dock itself seems fine — monitors work, charging works — but USB devices are dead.
Apple Silicon sleep/wake USB issue
This is a well-documented behavior on Apple Silicon Macs. After sleep and wake, some USB controllers in third-party docks fail to re-initialize properly. The monitors and charging still work because those run over Thunderbolt/USB-C directly. The USB devices fail because they’re on the dock’s internal USB 3.0 controller, which didn’t wake up correctly.
Quick fix: Unplug the dock cable from the Mac (not from the dock), wait 5 seconds, reconnect it. This triggers a full Thunderbolt re-negotiation and usually wakes the USB controller.
Persistent fix: In System Settings → Battery → Options → disable “Low power mode” if it’s on. Low power mode can aggressively cut power to USB subsystems during sleep.
The “USB accessories” security prompt
macOS Ventura and later show a prompt when a new USB device is connected: “Allow accessory to connect?” If you locked your Mac while the dock was connected, macOS may have blocked the USB devices as an unknown accessory.
Go to System Settings → Privacy & Security → Accessories → change from “Ask every time” to “Always allow.”
Bus-powered devices drawing too much power
If you plug in a 2.5-inch external hard drive (the type without its own power supply), it draws all its power from the USB port. Some docks have a limited per-port USB power budget. Connecting too many bus-powered devices at once can cause some to drop out or fail to initialize.
Use powered USB devices where possible, or use a dock with a higher power budget per USB port. CalDigit docks in particular have a higher per-port USB budget than most budget alternatives.
Device-specific drivers missing
Some USB devices — particularly older Ethernet adapters built into docks — need a driver on macOS. The most common is Realtek’s USB Ethernet driver. If your dock’s Ethernet works on Windows but not Mac, it almost certainly needs a driver that macOS doesn’t include by default.
Check the dock manufacturer’s support page for macOS drivers. For Realtek-based Ethernet, download the driver directly from Realtek’s website.
Problem 7: Ethernet Not Working
The dock is connected, everything else works, but the wired Ethernet shows “Not connected” or doesn’t appear at all.

Check System Settings first
System Settings → Network. Does any Ethernet option appear in the list? Look for “USB Ethernet,” “Thunderbolt Ethernet,” or “Ethernet Adaptor.” If it appears but shows “Not connected,” the adapter is being detected but the cable or network isn’t working. If nothing appears at all, the adapter itself isn’t being recognized.
Dock’s Ethernet chip needs a driver
This is the most common cause on Macs. Many docking stations use Realtek or ASIX Ethernet chips that macOS doesn’t natively support. The dock works on Windows because Windows has built-in drivers for these chips. macOS doesn’t.
Download the macOS driver from the dock manufacturer’s support page. If the manufacturer doesn’t list one, check the Realtek website for their macOS Ethernet driver.
After installing the driver, restart your Mac and reconnect the dock. The Ethernet interface should now appear in System Settings → Network.
DHCP renewal after connection
Sometimes macOS picks up the Ethernet connection but gets stuck waiting for a DHCP address from your router.
System Settings → Network → select the Ethernet interface → click the three-dot menu → Renew DHCP Lease. If that doesn’t work, disconnect from Wi-Fi entirely, unplug the Ethernet cable, wait 30 seconds, reconnect the Ethernet cable.
Reconnect in a specific order
A quirk that has worked for many users: disconnect the dock, disconnect your router’s power, wait 30 seconds, power the router back on, then reconnect the dock once the router has fully booted. The sequence of network negotiation seems to matter in some edge cases.
Problem 8: Dock Not Recognized After macOS Update
You updated macOS. Now your dock works partially or not at all. Everything was fine yesterday.
This is more common than it should be. Apple makes changes to Thunderbolt handling, USB power management, and security policies in virtually every major macOS release. Third-party dock manufacturers sometimes need weeks to catch up with firmware and driver updates.
Immediate fixes to try
- Restart your Mac completely — not just close the lid. Full shutdown and power back on.
- Reset NVRAM (see Problem 3 above).
- Disconnect and reconnect the dock while the Mac is fully awake and unlocked.
- Check for dock firmware update — the manufacturer may have already released one.
Check if the Thunderbolt security setting changed
macOS updates occasionally reset or change the Thunderbolt security level.
System Settings → Privacy & Security → Security → check “Thunderbolt Accessories.” It should be set to “Always allow.” If it reverted to “Ask every time” or “Never,” change it.
Wait for the manufacturer’s firmware update
If none of the above works and the problem clearly started with a specific macOS update, the dock firmware needs an update. CalDigit, OWC, and Plugable all have active support teams who release firmware patches within weeks of major macOS releases. Check their support pages or subscribe to their notification lists.
In the meantime, temporarily rolling back macOS is an option if you’re comfortable with that process — though for most users, waiting for the firmware update is simpler.
Problem 9: Blurry or Low-Resolution Display Through Dock
The monitor looks fuzzy, has low resolution, or macOS is rendering it at the wrong scale. Everything looks fine on the MacBook screen itself.
Check the Displays scaling setting
System Settings → Displays → select the external monitor → look at the resolution setting. If it’s set to a scaled resolution significantly lower than your monitor’s native resolution, increase it. Click “Show all resolutions” if you don’t see your monitor’s native option.
The monitor cable is the issue
If macOS can’t detect your monitor’s native resolution, it defaults to a lower one. This usually happens because:
- The cable doesn’t support the bandwidth required for the monitor’s full resolution
- You’re using HDMI 1.4 instead of HDMI 2.0 (HDMI 1.4 caps at 4K@30Hz; 4K@60Hz needs HDMI 2.0)
- The cable is damaged or marginal
Replace with a verified HDMI 2.0 or DisplayPort 1.4 cable and reconnect.
DisplayLink resolution limitation
DisplayLink displays are software-rendered and may have resolution or refresh rate limits depending on your Mac model and the dock’s DisplayLink chip version. Newer DisplayLink 6 chips support 4K@60Hz; older DisplayLink 4 chips are limited to 4K@30Hz or 1080p@60Hz. If you’re seeing a resolution cap on a DisplayLink display, check which DisplayLink chip version your dock uses.
Delete display preference files (macOS display cache)
macOS stores cached display configurations. If this cache becomes corrupted — usually after a macOS update or when switching between different monitors — it can cause persistent resolution or scaling problems.
Quit all applications first. Open Finder → Go → Go to Folder → type: ~/Library/Preferences/ByHost/
Look for files with “displays” in the name, move them to your Desktop (don’t delete them yet), restart your Mac, and reconnect the monitor. macOS will rebuild fresh display preference files. If the problem is fixed, delete the old files from your Desktop.
Problem 10: Dock Makes MacBook Run Hot
Your Mac runs noticeably hotter when docked, the fan runs more than usual, or you see “CPU throttling” warnings.
This is partially expected — here’s why
When your Mac is docked, it’s typically doing more than it does standalone:
- Driving external monitors (active display engines)
- Processing network traffic via Ethernet
- Powering USB devices
- Managing higher power delivery
All of this is real work for the chip. Some heat increase is normal and expected.
The DisplayLink factor
If you’re using a DisplayLink dock, your CPU is actively processing video compression for each DisplayLink display. This is software-rendered video output — it uses real CPU cycles, unlike native Thunderbolt display output which uses dedicated display hardware. On older Macs or during intensive tasks, the extra DisplayLink CPU load can be noticeable.
There’s no fix for this specifically — it’s how DisplayLink works. If heat is a significant concern and you have an M3 Air or newer Mac, switching to a native Thunderbolt dock (in clamshell mode for M3 Air) eliminates the DisplayLink CPU overhead.
Check if a specific dock port is causing excessive charging heat
Some docks deliver charging power very aggressively — they push maximum watts regardless of the battery level. This can generate heat at the charging cable connection point and in the battery management system.
If your MacBook runs hot specifically at the USB-C port where the dock connects, try enabling Battery Health Management: System Settings → Battery → Battery Health → Manage Battery Longevity. This limits charging to 80% by default, which reduces heat generation during charging.
Ventilation around the dock itself
A hot dock radiates heat upward. If the dock sits directly under your MacBook, or if the MacBook sits on top of the dock, the dock’s heat adds to the Mac’s thermal environment. Keep the dock separate from the Mac — to the side, not underneath.
Problem 11: Audio Not Working Through Dock
You’ve plugged headphones or speakers into the dock’s audio jack and hear nothing.
macOS isn’t outputting to the dock’s audio
When you plug audio devices into a dock, macOS doesn’t always switch to the dock’s audio automatically.
Click the Control Center icon (top-right menu bar) → Sound → select the dock’s audio output. If you don’t see it listed, the dock’s audio isn’t being detected.
If the dock’s audio never appears in System Settings → Sound → Output, the dock may require a driver for audio. Some dock audio chips (particularly on budget docks) need Realtek drivers on macOS. Check the manufacturer’s support page.
DisplayLink audio note
If you’re using a DisplayLink dock, the audio output associated with DisplayLink displays is routed through the DisplayLink software stack, not the standard macOS audio pipeline. This can cause audio to disappear after sleep/wake or after a DisplayLink driver update. Reinstall the DisplayLink Manager driver and make sure it has the required permissions.
Quick Reference: Problem → Fix Summary
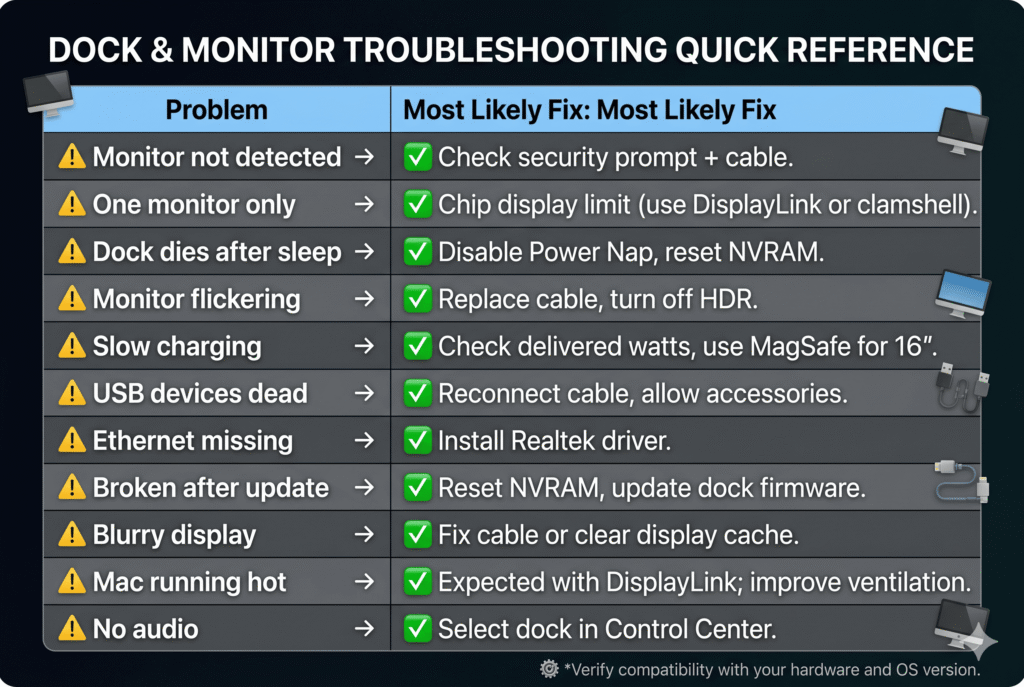
| Problem | Start Here |
|---|---|
| Monitor not detected | Check Privacy & Security → Accessories permission |
| Only one monitor works | Check your Mac’s chip display limit first |
| Dock dies after sleep | Disable Power Nap, update dock firmware |
| Monitor flickering | Replace cable (not the dock, the cable) |
| Charging slowly | Check delivered watts vs your Mac’s requirement |
| USB devices not working | Disconnect/reconnect dock cable; check Accessories permission |
| Ethernet not showing up | Install Realtek driver from manufacturer’s support page |
| Broken after macOS update | Reset NVRAM; check for dock firmware update |
| Blurry/wrong resolution | Fix cable type or clear display preference cache |
| Mac running hot | Expected with DisplayLink; check dock ventilation |
| No audio through dock | Select dock audio in Control Center |
Which Macs Have the Most Common Dock Issues?
Based on the problems documented above, here’s where dock trouble concentrates by model:
MacBook Air M1 and M2 — The dual-monitor limitation is the most commonly encountered issue for these users. It isn’t a defect; it’s a hardware design. DisplayLink solves it but adds complexity. For anyone buying a dock for an M1 or M2 Air specifically to add a second monitor, research DisplayLink compatibility before purchasing.
MacBook Air M3 — Clamshell dual-monitor mode works but requires macOS Sonoma 14.6+. Users on older macOS versions will see only one display. Verify your macOS version before troubleshooting further.
MacBook Air M4 and M5 — The cleanest docking experience in the Air lineup. Two monitors work natively, no workarounds. Main issues are typically cable-related or sleep/wake related.
MacBook Pro 14-inch M3 base — Often confused with M3 Pro. Only has 2 Thunderbolt ports (not 3) and the same 1-display-native limitation as M1/M2 base chips. Buyers frequently purchase Thunderbolt 4 docks and are confused when dual monitors don’t work natively.
MacBook Pro M4 Pro / M4 Max and M5 Pro / M5 Max — Thunderbolt 5 models. Dock and cable compatibility is important here — using a standard USB-C cable instead of a certified Thunderbolt 4 or TB5 cable silently limits performance to USB-C speeds. Most dock issues on these machines are cable-related.
When to Accept It’s Not Your Dock
Some behaviors that look like dock problems are actually macOS behaviors that won’t be fixed by any dock or cable change:
Mirroring instead of extending on first connection: macOS sometimes defaults to mirroring when a new external display is first connected. Go to System Settings → Displays → Arrangement and uncheck “Mirror Displays.” This is a preference, not a defect.
Display resolution resets after unplugging: macOS stores per-display configurations. Unplugging and replugging can reset to a different default scaling. Set it once, let macOS remember it, and it usually stays consistent.
Slight delay before external monitors turn on after wake: This is Thunderbolt renegotiation time. It typically takes 2–5 seconds for displays to appear after the Mac wakes. This is normal.
DisplayLink Netflix black screen: DRM-protected streaming services (Netflix, Disney+, Apple TV+) detect DisplayLink as a screen-capture-capable surface and show a black screen. This is intentional content protection behavior. To watch Netflix on an external screen, use a native Thunderbolt display (not DisplayLink).
FAQ
My dock worked fine until a macOS update. Is the dock broken?
Almost certainly not. macOS updates frequently change Thunderbolt and USB power management behavior. The first step is always: update the dock’s firmware, reset NVRAM, and check the dock manufacturer’s support page for a known fix. Most issues after macOS updates resolve within a few weeks when the dock manufacturer releases a firmware patch.
Can I use two docks at the same time?
Yes — if your Mac has two Thunderbolt ports, you can connect a dock to each. The combined display count and bandwidth still can’t exceed what your Mac’s chip supports natively. Two docks on an M1 Air will still only drive one external display total.
My dock works perfectly on Windows but has problems on Mac. Why?
macOS handles Thunderbolt and USB power management differently from Windows. Drivers that work automatically on Windows need explicit macOS versions (Ethernet chips in particular). Apple Silicon’s aggressive power management also affects how docks behave after sleep in ways that Windows laptops typically don’t encounter.
Do I need to install any drivers for a Thunderbolt dock?
Thunderbolt docks themselves don’t need drivers — macOS handles them natively. However, the internal components of a Thunderbolt dock — particularly the Ethernet chip and sometimes the audio chip — may need drivers. Check your dock’s support page for macOS-specific drivers for Ethernet.
My dock worked perfectly for months, then suddenly stopped. What happened?
Three things cause sudden dock failures after extended working use: a macOS update changed behavior, the dock’s firmware has a bug that was triggered by some condition, or the dock itself is failing thermally or electrically. Rule out software first (update firmware, reset NVRAM), then consider hardware replacement if software fixes don’t resolve it.
Which docks have the least Mac-related problems?
From our testing and community reports, CalDigit and Plugable consistently have the best Mac driver support, quickest firmware updates after macOS releases, and most responsive support teams. These brands actively test against macOS betas before public releases, which means their docks tend to survive macOS updates without incident.
All information in this article is based on Apple’s official documentation, dock manufacturer support knowledge bases, and verified community reports. Verified May 2026.
Having a problem that’s not listed here? Use our dock finder tool to find a more compatible dock for your specific Mac model, or check our model-specific guides linked throughout the site.