Last Updated: May 2026 | By Erdem Ugurluol | This article contains affiliate links. If you buy through them, I may earn a small commission at no extra cost to you.
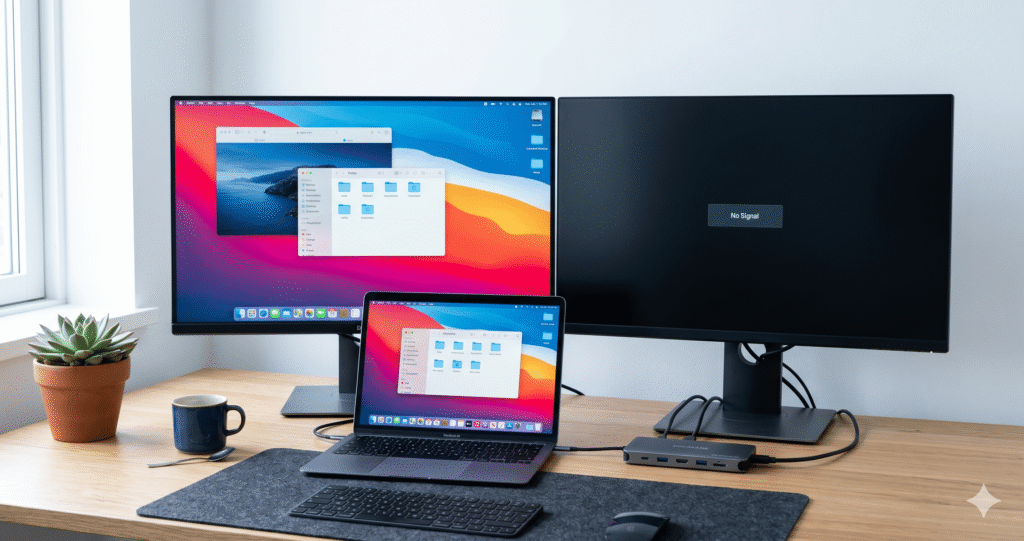
You connected two monitors. Only one shows anything. The other is either completely black, mirroring the first one, or simply doesn’t appear in System Settings at all.
This is one of the most searched Mac problems on the internet. It happens to experienced users who have owned Macs for years. It happens to people who just spent $200 on a dock. And it’s almost never caused by a faulty monitor or a broken port.
There are five distinct reasons a Mac only detects one external monitor. Four of them are fixable. One of them is a hardware limitation that no amount of troubleshooting will change — and knowing which one you’re dealing with saves hours of frustration.
This guide covers every cause, in order from most common to least common, with specific fixes for each. It covers every Apple Silicon Mac from M1 to M5.
Check Your Mac Model First — This Takes 30 Seconds
Before trying anything, identify your Mac’s exact chip. This single piece of information tells you immediately whether your problem is fixable with settings, fixable with a different dock, or a hardware limit you’ll need to work around.
How to check: Apple menu (top-left) → About This Mac → look at the chip name.
| What you see | What it means for dual monitors |
|---|---|
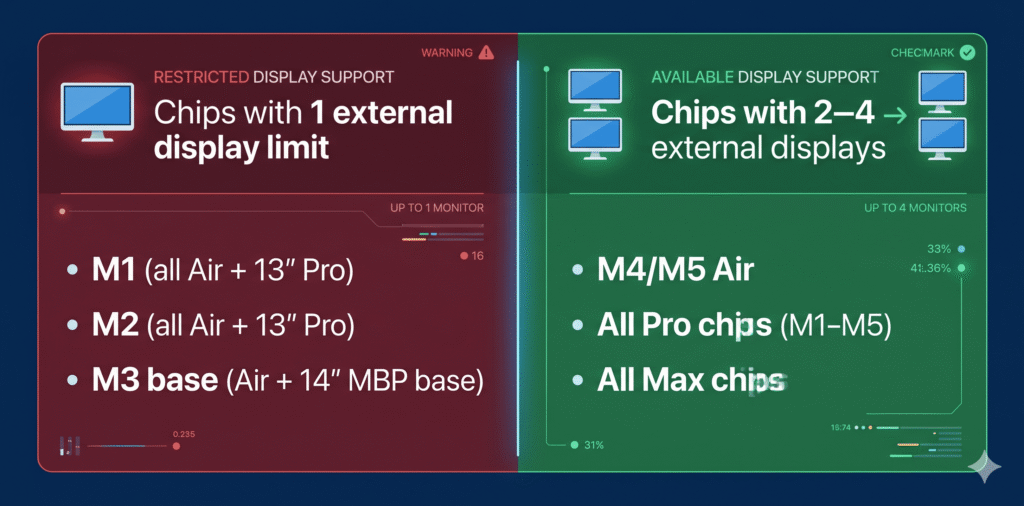
| Apple M1 or M2 (no suffix) | 1 external monitor natively. Second monitor needs DisplayLink. |
| Apple M3 (no suffix) | 1 external monitor with lid open. 2 monitors with lid closed. |
| Apple M4 or M5 (no suffix) | 2 external monitors natively, lid open or closed. ✓ |
| M1 Pro / M2 Pro / M3 Pro | 2 external monitors natively. ✓ |
| M4 Pro / M5 Pro | 2–3 external monitors natively (M5 Pro: 3). ✓ |
| M1 Max / M2 Max / M3 Max | 4 external monitors natively. ✓ |
| M4 Max / M5 Max | 4–5 external monitors natively. ✓ |
If your chip has no suffix (just “M1,” “M2,” or “M3”), jump straight to Cause 1 below. That’s almost certainly your issue.
If your chip has a Pro, Max, or Ultra suffix — or you have M4 or M5 base chips — scroll past Cause 1 and start with Cause 2.
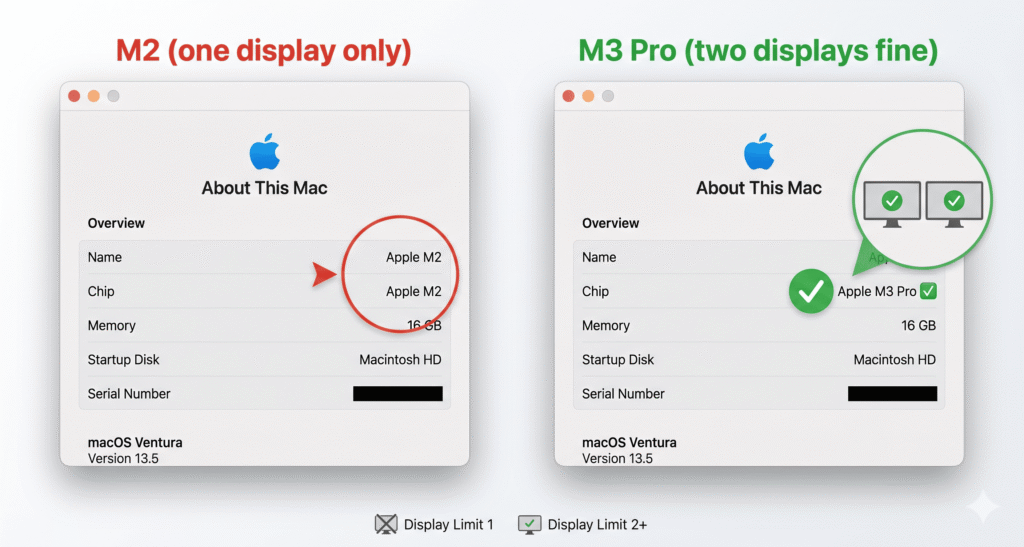
Cause 1: Your Mac’s Chip Has a One-Display Hardware Limit
This is the answer for the majority of people asking this question. It’s not a dock problem. It’s not a cable problem. It’s a hardware design decision baked into the chip itself.
Apple Silicon chips have a fixed number of dedicated display engines — hardware circuits specifically designed to push pixels to screens. The base M1 and M2 chips have exactly one display engine allocated for external monitors. No software, no driver, and no dock can add a second hardware display engine.
Here’s how it breaks down by chip, clearly:
MacBook Air M1 (2020)
Native external displays: 1
One external monitor, maximum. The second monitor either shows nothing, mirrors the first one, or appears briefly before going black. This behavior is the same whether you’re using a $30 hub or a $400 CalDigit dock. The dock isn’t the problem.
Affected models: MacBook Air M1 (13-inch, Late 2020)
MacBook Air M2 — 13-inch and 15-inch (2022–2023)
Native external displays: 1
Identical situation to M1. The M2 brought faster performance but the same one-external-display architecture for the base chip. The M2 Air also brought back MagSafe, which helps with cable management, but doesn’t change the display limit.
Affected models: MacBook Air M2 13-inch (2022), MacBook Air M2 15-inch (2023)
MacBook Pro 13-inch M1 and M2 (2020–2022)
Native external displays: 1
Same base chip as the MacBook Air variants. One external display. The 13-inch Pro’s fan gives it better sustained performance when docked, but the display limit is identical.
Affected models: MacBook Pro 13-inch M1 (Late 2020), MacBook Pro 13-inch M2 (2022)
MacBook Pro 14-inch M3 base (Late 2023)
Native external displays: 1 (lid open) / 2 (lid closed)
This one surprises a lot of buyers. There’s a base M3 version of the 14-inch MacBook Pro — not just the M3 Pro and M3 Max. The base M3 chip has the same one-display hardware limit as M1 and M2, with the clamshell exception added later (same as M3 Air). It also only has two Thunderbolt ports, unlike the three on M3 Pro and M3 Max models.
Affected models: MacBook Pro 14-inch M3 (base chip, Late 2023)
MacBook Air M3 — 13-inch and 15-inch (2024)
Native external displays: 1 (lid open) / 2 (lid closed)
M3 Air is a special case. Apple gave it the ability to run two external displays — but only when the MacBook lid is closed (clamshell mode). With the lid open and the built-in display active, you’re back to one external monitor.
This requires macOS Sonoma 14.3 or later for MacBook Air M3, and macOS Sonoma 14.6 or later for MacBook Pro M3 base.
Affected models: MacBook Air M3 13-inch (2024), MacBook Air M3 15-inch (2024)
What to do if your Mac has this limitation
You have three options, depending on your Mac model:
Option A — Close the lid (M3 Air and M3 MacBook Pro base only)
If you have an M3 Mac, close the lid. Connect power, an external keyboard, and an external mouse first — the Mac needs those connected before you close the lid to enter clamshell mode correctly.
- Connect your Mac to power
- Connect an external keyboard and mouse (Bluetooth or USB)
- Connect Monitor 1 to the first Thunderbolt/USB-C port
- Connect Monitor 2 to the second Thunderbolt/USB-C port (or the dock’s second output)
- Close the MacBook lid
- Both monitors should appear in System Settings → Displays
If you open the lid after both monitors are running, the second external monitor will disconnect. That’s by design, not a bug.
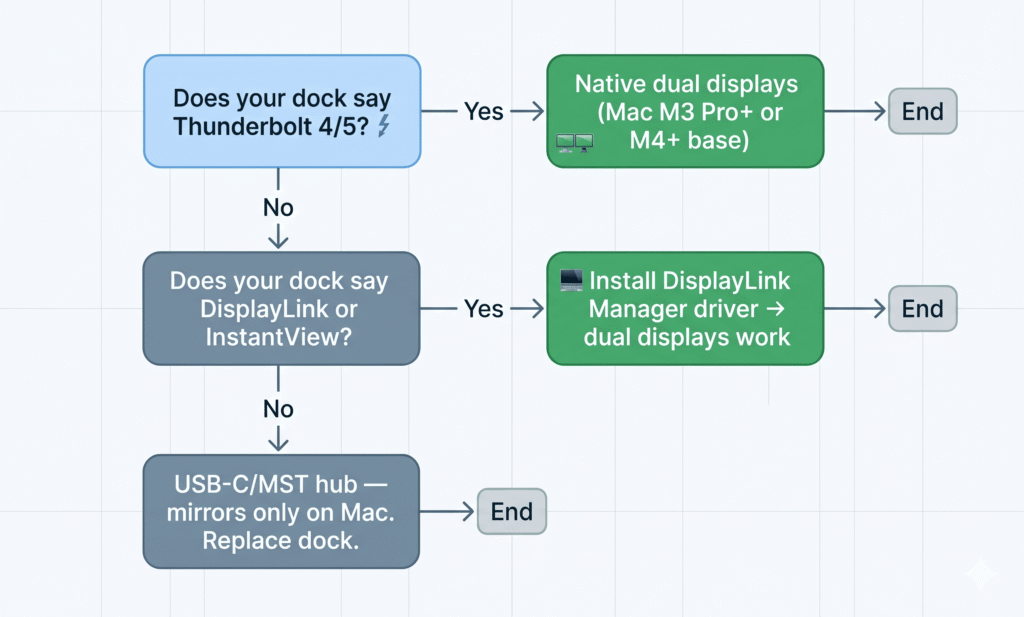
Option B — Use a DisplayLink dock
DisplayLink is a technology that uses your Mac’s CPU (instead of the dedicated display hardware) to drive a second monitor. It works on M1, M2, and M3 base chips. The output is software-rendered rather than hardware-accelerated, which adds a small amount of CPU overhead but is completely usable for productivity work.
To use DisplayLink:
- Get a dock that explicitly lists DisplayLink or InstantView support (your current dock likely doesn’t have this — most Thunderbolt and USB-C docks don’t)
- Download and install DisplayLink Manager for macOS from the Synaptics website (free)
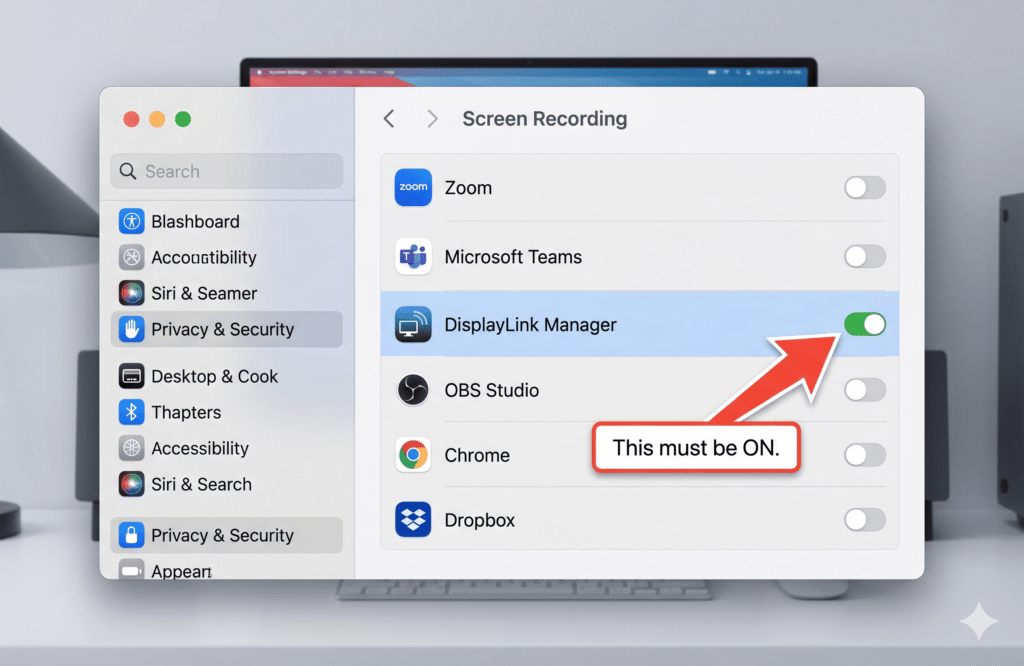
- Open System Settings → Privacy & Security → Screen Recording → toggle DisplayLink Manager on
- Restart DisplayLink Manager if prompted
- Connect your dock — the second monitor should now appear as an extended display
Important caveats about DisplayLink:
- DRM-protected streaming (Netflix, Disney+, Apple TV+) will show a black screen on DisplayLink displays. This is content protection behavior, not a bug.
- DisplayLink adds a small CPU load — typically 5–15% extra CPU usage per display on M-series Macs
- Color accuracy is slightly lower than native output, though for most productivity use this is not noticeable
- DisplayLink requires the free app running at all times when the second display is in use
Option C — Upgrade to M4 Air or later
M4 MacBook Air (2025) was the first base chip Mac to natively support two external monitors without any workaround, without closing the lid, and without DisplayLink. If the DisplayLink caveats (DRM, CPU overhead, driver dependency) are deal-breakers for your workflow, the cleanest solution is upgrading to M4 or M5.
Cause 2: Your Monitors Are Mirroring Instead of Extending
Both monitors are on. Both show the same image. macOS only lists one display in System Settings.
This looks like a single-monitor detection problem but it’s actually a different issue. The Mac sees both monitors — it’s just showing the same content on both.
The MST problem — the most common cause
This is a USB-C and dock compatibility issue that trips up thousands of Mac users every year.
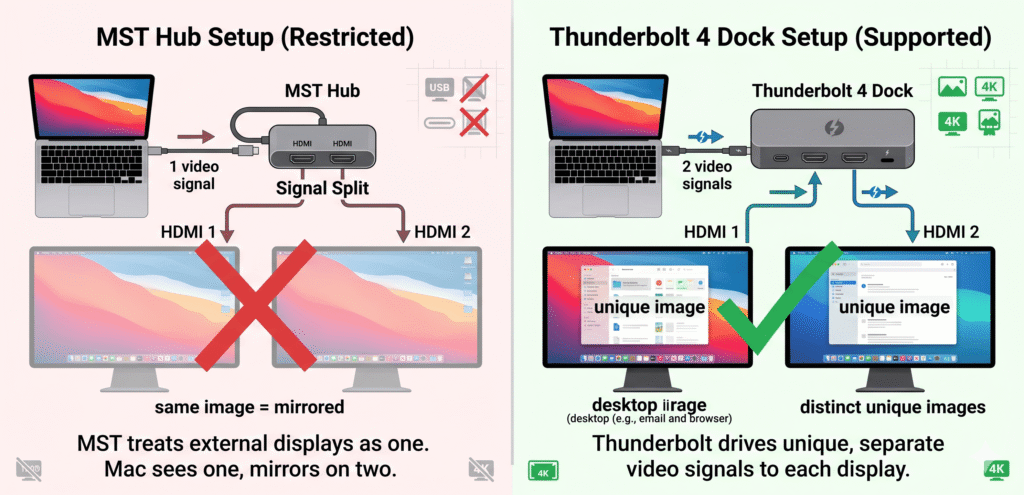
Many docks and hubs have two HDMI ports but use a technology called MST (Multi-Stream Transport) to split one DisplayPort signal into two HDMI outputs. MST is a DisplayPort standard that works perfectly on Windows laptops. macOS does not support MST for extending displays.
When macOS sees an MST signal, it treats both outputs as a single logical display and mirrors them. Both monitors light up, both show the same content, and System Settings shows only one external display — because as far as macOS is concerned, it is one display.
No setting change, driver install, or cable swap fixes this. An MST hub is simply incompatible with extended display mode on Mac.
How to tell if your hub uses MST: If your hub or dock has two or more HDMI/DisplayPort outputs but is not labeled as Thunderbolt or DisplayLink, it almost certainly uses MST internally. The listing may say “Dual 4K” — which is accurate for Windows, not for Mac.
The fix: You need one of these instead:
- A Thunderbolt 4 or 5 dock (each display output runs independently over Thunderbolt)
- A DisplayLink dock (each display output runs independently over software)
- Connect each monitor directly to a separate Thunderbolt port on the Mac with individual cables
Mirroring is turned on in System Settings
Sometimes macOS defaults to mirroring mode when a display is first connected, or a previous user turned it on.
System Settings → Displays → select the second display in the sidebar → look for “Use as” and change it to “Extended display.” Alternatively, click “Arrangement” and make sure “Mirror Displays” is unchecked.
If you don’t see the second display in System Settings at all, the issue isn’t mirroring — it’s detection. Continue to Cause 3.
Cause 3: Your Dock or Hub Doesn’t Actually Support Two Video Outputs on Mac
You bought a dock with two HDMI ports. Windows users might get both working. Mac users frequently don’t. Here’s why.
Not all docks are created equal for Mac video output. There are three architectures, and only two work for extended dual displays on Mac:
Architecture 1 — Thunderbolt dock Uses the Thunderbolt protocol to carry two independent DisplayPort signals. Works natively on any Mac with sufficient display support for that chip. No drivers needed. Best quality output.
Architecture 2 — DisplayLink dock Uses the DisplayLink chip to process one or more displays through USB. Requires DisplayLink Manager driver. Works even on M1/M2 base chips. Adds software overhead.
Architecture 3 — USB-C hub with MST Uses DisplayPort Multi-Stream Transport. Two HDMI outputs share one DisplayPort signal. Works on Windows. Does not work for extended displays on macOS. Causes mirroring.
Before buying any dock, look for one of these in the product listing:
- “Thunderbolt 4” or “Thunderbolt 5” certification
- Explicit mention of “DisplayLink” technology
- “macOS dual display support” listed in the compatibility section
If the listing says “Dual 4K HDMI” without any of the above, treat it as MST until proven otherwise.
Cause 4: macOS Needs Permission to Use the Second Display
macOS Ventura (13) and later added a USB accessory security feature. When a new device — including a dock — is connected, macOS may show a prompt asking for permission. If you missed this prompt or clicked “Don’t Allow,” the dock’s video outputs can be blocked.
This causes situations where the dock worked before and suddenly stopped, or where it partially works (charging and USB devices function but the second display doesn’t).
Fix: System Settings → Privacy & Security → scroll to “Accessories” → change “Allow accessories to connect” from “Ask every time” to “Always allow.”
After changing this, disconnect and reconnect the dock cable. The second display may now appear.
If you don’t see this setting, disconnect the dock, lock your screen (Command + Control + Q), then reconnect the dock while the screen is locked. macOS should show the accessory permission prompt. Unlock your Mac and allow access.
Cause 5: Wrong Cable Between Mac and Dock, or Between Dock and Monitor
Cables are the most overlooked part of a display setup. A cable that’s wrong for the job causes exactly the symptoms of a single-monitor detection problem.
Cable between Mac and dock
The cable connecting your MacBook to the dock needs to carry Thunderbolt or USB4 if you want the dock to handle multiple displays and full bandwidth. A standard USB-C cable — the kind that comes with a phone charger — often only carries charging and basic USB 2.0 data. It will not carry video.
Always use the cable that shipped with your dock. If you need a replacement, get a Thunderbolt 4 certified cable.
Signs the Mac-to-dock cable is wrong:
- One display works but the second doesn’t appear
- Dock charges the Mac but USB devices and second display don’t work
- Displays worked with a different cable
Cable between dock and monitor
The cable from your dock’s output to the monitor has its own requirements:
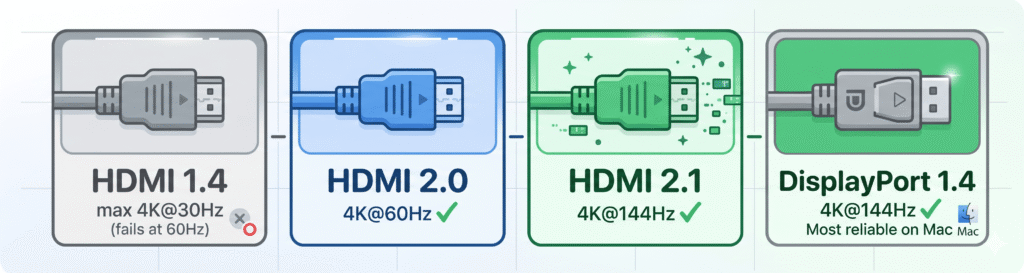
- HDMI 1.4 — Maximum 4K at 30Hz. At 4K@60Hz, the second display will fail or show no signal.
- HDMI 2.0 — Supports 4K at 60Hz. Use this for any 4K monitor at 60Hz.
- HDMI 2.1 — Supports 8K, 4K at 144Hz. Required for high refresh rate gaming monitors.
- DisplayPort 1.4 — Supports 4K at 144Hz and 8K at 60Hz. Generally more reliable than HDMI on Mac.
If your second monitor shows no signal or goes black intermittently, try replacing the cable from dock to monitor with a higher-rated one, or swap from HDMI to DisplayPort if your monitor supports both.
Cause 6: macOS Display Preference Cache Is Corrupted
This is rare but it does happen, usually after a macOS update or after switching between different monitor models. macOS stores cached display configurations in preference files. If these become corrupted, the second display may consistently fail to initialize even though everything else is correct.
Symptoms: The second monitor was working, then stopped after a macOS update. Or it works with one cable/port combination but not another, inconsistently.
Fix:
Quit all open applications first. Then:
- Open Finder
- In the menu bar: Go → Go to Folder
- Type:
~/Library/Preferences/ByHost/ - Look for files with “displays” or “WindowServer” in the name
- Move them to your Desktop (don’t delete yet — keep as backup)
- Restart your Mac
- Reconnect the dock and both monitors
macOS will build fresh display preference files. If both monitors now appear correctly, delete the old preference files from your Desktop. If the problem returns, those old files weren’t the issue — move them back.
Step-by-Step Diagnosis: What to Try and In What Order
If you’ve read the causes above and you’re still not sure which one applies to you, work through these steps in order.
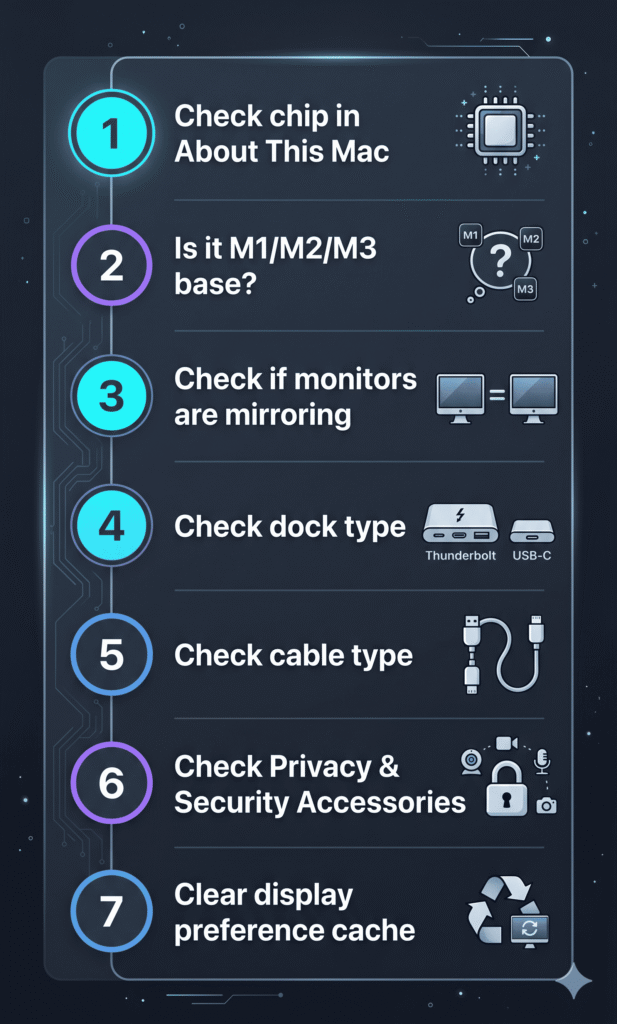
Step 1 — Check your chip. Apple menu → About This Mac. Note whether it’s M1, M2, M3, M3 Pro, M4, etc. If it’s a base chip (no suffix) and isn’t M4 or M5, Cause 1 is almost certainly your issue.
Step 2 — Check if the second monitor appears in System Settings → Displays. If both monitors appear but show the same content, it’s mirroring (Cause 2). If the second monitor doesn’t appear at all, it’s detection (Causes 1, 3, 4, or 5).
Step 3 — Test with monitors connected directly, bypassing the dock. Plug each monitor into a separate Thunderbolt port on the Mac using individual cables. If both monitors work this way, your dock is the problem (Cause 3). If one still doesn’t work, it’s Cause 1 (chip limit) or Cause 5 (cable).
Step 4 — Check the dock type. Look up your dock’s product page. Does it say Thunderbolt 4, Thunderbolt 5, or DisplayLink? If none of those, it’s an MST hub and won’t support extended dual displays on Mac (Cause 3).
Step 5 — Check Privacy & Security → Accessories. Set to “Always allow” and reconnect the dock (Cause 4).
Step 6 — Replace the cable between Mac and dock. Use the original cable the dock shipped with. If you don’t have it, use a certified Thunderbolt 4 cable (Cause 5).
Step 7 — Clear the display preference cache as described in Cause 6 above.
If none of these resolve it and your chip is M4 or newer with a Thunderbolt dock, contact the dock manufacturer’s support. CalDigit and Plugable both have excellent Mac-specific support teams.
Quick Reference: Mac Chip vs. What You Need
This is the practical decision table. Find your chip, find out exactly what you need to run two monitors.
| Your Chip | Lid Open | Lid Closed | What You Need |
|---|---|---|---|
| M1 Air / M1 Pro 13″ | 1 monitor | 1 monitor | DisplayLink dock |
| M2 Air / M2 Pro 13″ | 1 monitor | 1 monitor | DisplayLink dock |
| M3 Air / M3 Pro 14″ base | 1 monitor | 2 monitors ✓ | Thunderbolt or USB-C dock + close lid |
| M4 Air | 2 monitors ✓ | 2 monitors ✓ | Any Thunderbolt dock |
| M5 Air | 2 monitors ✓ | 2 monitors ✓ | Any Thunderbolt dock |
| M1 Pro 14/16″ | 2 monitors ✓ | 2 monitors ✓ | Any Thunderbolt dock |
| M2 Pro 14/16″ | 2 monitors ✓ | 2 monitors ✓ | Any Thunderbolt dock |
| M3 Pro 14/16″ | 2 monitors ✓ | 2 monitors ✓ | Any Thunderbolt dock |
| M4 Pro 14/16″ | 2 monitors ✓ | 2 monitors ✓ | Thunderbolt dock (TB5 ideal) |
| M5 Pro 14/16″ | 3 monitors ✓ | 3 monitors ✓ | Thunderbolt dock (TB5 ideal) |
| M1 Max / M2 Max / M3 Max | 4 monitors ✓ | 4 monitors ✓ | Thunderbolt dock |
| M4 Max / M5 Max | 4 monitors ✓ | 4 monitors ✓ | Thunderbolt dock (TB5 ideal) |
What If Your Monitors Are Both Detected But One Is Wrong?
Sometimes both monitors appear in System Settings but one looks wrong — blurry, at the wrong resolution, or showing a scaled image that doesn’t look sharp.
Blurry or low resolution on one monitor
Go to System Settings → Displays → select the affected monitor → click the resolution dropdown. Make sure it’s set to your monitor’s native resolution. If you see “Default for display,” that’s usually fine — it’s macOS’s retina-equivalent setting. But if it looks blurry, click “More Space” or manually enter the native resolution (e.g., 3840×2160 for a 4K monitor).
If the native resolution isn’t listed, the cable from dock to monitor is not supporting the full bandwidth. Replace the cable with an HDMI 2.0 or DisplayPort 1.4 rated cable.
Wrong orientation or position
System Settings → Displays → Arrangement. You can drag the display icons to match their physical position on your desk. The menu bar shows which display is set as primary — drag it to change.
Clamshell Setup Guide for M3 Macs (Step by Step)
If you have an M3 Mac and want to run two monitors using the lid-closed method, here’s the exact setup process.
What you need:
- MacBook Air or MacBook Pro with M3 chip
- macOS Sonoma 14.3 or later (Air) / 14.6 or later (MacBook Pro 14-inch M3 base)
- External keyboard and mouse (Bluetooth or wired)
- External power (the Mac must be plugged in)
- Two monitors with USB-C, HDMI, or DisplayPort inputs
- A dock or two separate adapters/cables
Setup steps:
- Connect the Mac to power (MagSafe or USB-C)
- Connect your external keyboard and mouse
- Connect Monitor 1 to the first Thunderbolt port (directly or via dock)
- Connect Monitor 2 to the second Thunderbolt port (directly or via dock)
- Let both monitors initialize with the lid open — confirm Monitor 1 appears in System Settings
- Close the MacBook lid
- Monitor 2 should now appear. Go to System Settings → Displays to confirm both are listed and set to “Extended display”
- Arrange the displays by dragging them in the Arrangement view to match their physical position

If both monitors still mirror instead of extending after closing the lid:
This is almost always the dock architecture issue (MST) described in Cause 2. Confirm your dock is a Thunderbolt dock or DisplayLink dock — not a standard USB-C hub with dual HDMI.
DisplayLink Setup Guide (For M1 and M2 Macs)
If you have an M1 or M2 Mac and have purchased a DisplayLink-compatible dock, here’s how to get the second monitor working.
What you need:
- A dock that explicitly supports DisplayLink (check the box or product page — it must say DisplayLink or mention the DisplayLink Manager app)
- macOS Big Sur 11.0 or later
- Admin password for your Mac
Setup steps:
- Visit synaptics.com/products/displaylink-graphics/downloads
- Download DisplayLink Manager for macOS (the current version as of May 2026 is 1.12.x)
- Open the downloaded package and install it — it requires your admin password
- After installation, open DisplayLink Manager from your Applications folder
- System Settings → Privacy & Security → Screen Recording → toggle DisplayLink Manager on (This permission is required — DisplayLink needs screen access to render the display output. It is not recording your screen.)
- Quit and reopen DisplayLink Manager if prompted
- Connect your DisplayLink dock to the Mac
- Connect the second monitor to the dock
- Both monitors should now appear in System Settings → Displays as independent extended displays
If DisplayLink Manager is installed but the second monitor doesn’t appear:
- Check that Screen Recording permission is granted (System Settings → Privacy & Security → Screen Recording → DisplayLink Manager must be on)
- Make sure DisplayLink Manager is running (check the menu bar for the DisplayLink icon)
- Confirm your dock actually has DisplayLink hardware — installing the driver on a non-DisplayLink dock does nothing
- Restart DisplayLink Manager: click its menu bar icon → Quit → reopen from Applications
If the second DisplayLink monitor shows Netflix/streaming as a black screen:
This is expected and cannot be fixed. DRM-protected content detects DisplayLink as a screen-capture surface and blocks output. Watch Netflix and Apple TV+ on your primary (native Thunderbolt) display, and use the DisplayLink display for productivity apps.
Frequently Asked Questions
I have a MacBook Air M2 and an expensive Thunderbolt 4 dock. Why doesn’t the second monitor work?
Because the M2 chip has a one-display hardware limit. No dock overcomes this — not even a $400 CalDigit. The dock is fine; the chip is the ceiling. To get a second monitor, you need a DisplayLink dock (different from a Thunderbolt dock) or an upgrade to M4 Air.
My two monitors worked yesterday. Today only one shows up. What changed?
Three most likely causes: a macOS update changed behavior (check for an update or a reboot that installed one), the Accessories permission was reset (System Settings → Privacy & Security → Accessories → set to Always allow), or the cable got slightly dislodged. Restart the Mac, check the permission, and reseat all cables.
Can I mix a Thunderbolt dock output with my Mac’s built-in HDMI for a second monitor?
Yes — and this is underused. MacBook Pro models (14-inch and 16-inch, all generations) have a built-in HDMI port that’s a completely separate display output from Thunderbolt. You can run one monitor from the dock and one from the built-in HDMI simultaneously, with the lid open. An M3 Pro 14-inch with a Thunderbolt dock can run two monitors via Thunderbolt plus a third via the HDMI port — three screens total, no DisplayLink needed.
Both monitors work when I directly connect them with individual cables. Why won’t they work through my dock?
Your dock is almost certainly using MST architecture — it splits one DisplayPort signal into two HDMI outputs. This works on Windows but macOS doesn’t support MST for extended displays. Replace the dock with a Thunderbolt dock or DisplayLink dock.
Does closing the lid on an M4 Air give me more monitors?
No — and that’s actually an improvement over M3. M4 Air supports two external monitors with the lid open or closed. You don’t need clamshell mode. Closing the lid on M4 Air just turns off the built-in screen — the external monitors still work the same way.
Will DisplayLink work for professional video or color grading work?
It’s not ideal. DisplayLink compresses video through software before sending it to the display, which reduces color accuracy compared to native Thunderbolt output. For everyday productivity, document editing, coding, and communication, DisplayLink is perfectly fine. For color-critical work — photo editing, video color grading, design work where accurate color matters — use a native Thunderbolt display output.
I have an M5 Pro and can only get two monitors to work. I thought it supports three?
M5 Pro supports three external monitors natively — but how you connect them matters. You need three separate display connections, each going to a separate Thunderbolt port or display output. If you’re connecting through a dock and only using two of the dock’s video outputs, try connecting the third monitor directly to one of the Mac’s Thunderbolt ports using an individual cable, alongside the dock.
The Bottom Line
The single most important takeaway from this article:
Your Mac’s chip determines how many monitors it can drive. No dock, cable, or software changes the chip’s hardware limit — except DisplayLink, which routes around it using the CPU.
If you have M1 or M2 base chips: one native external monitor. DisplayLink dock is the solution.
If you have M3 base chip (Air or 14-inch Pro base): one monitor with lid open, two with lid closed. Close the lid.
If you have M4 or M5 base chips, or any Pro/Max chip: you should have no problem with two monitors if your dock is Thunderbolt certified and your cables are correct. If you’re still seeing one monitor, work through Causes 2–6 above.
All specifications in this article are based on Apple’s official support documentation. Verified May 2026.
Use our Mac Dock Finder tool to find the right dock for your specific MacBook model and monitor setup.