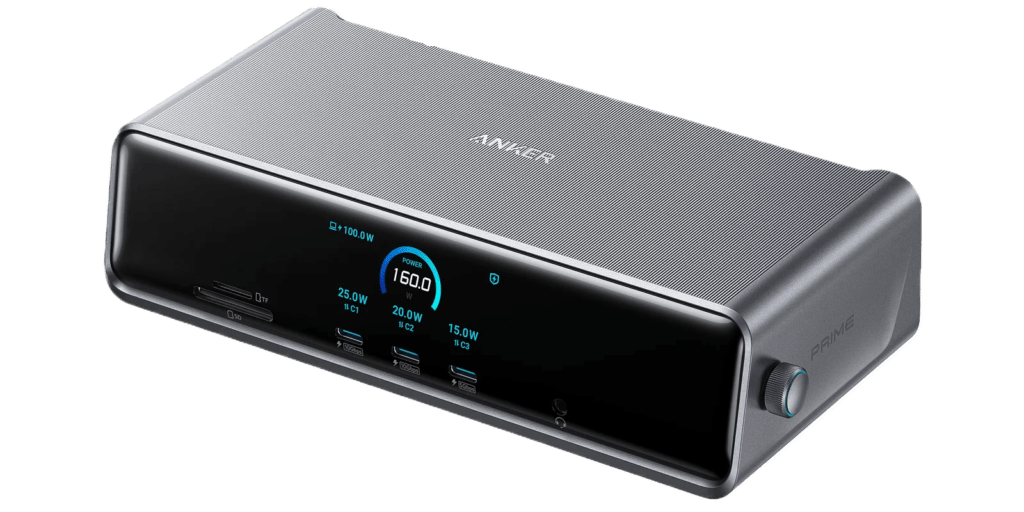
Model: Anker Prime Docking Station (14-in-1, Triple Display, DisplayLink) — A83B3
Price: $299.99
Rating: ★★★★☆ (4/5) — Recommended for M-series Mac users who need triple displays
The Anker Prime DisplayLink Docking Station promises something most Mac docks can’t deliver: triple-display support for every M-series MacBook — including base-chip models Apple locks to a single external screen. After several weeks of daily use, here’s my honest breakdown from a Mac user’s perspective.
Quick verdict: If you own a MacBook Air and want three monitors, this is the dock to buy. If you own an M5 Max MacBook Pro and already support four displays natively, look elsewhere.
What Makes This Dock Different
This is a fundamentally different product from Anker’s TB5 dock — even though the name looks nearly identical. The A83B3 uses DisplayLink technology (specifically the DL7400 chip) to drive its three video outputs, not native Thunderbolt. That single fact shapes everything about your experience with it on a Mac.

The tradeoff in plain language:
- ✅ Drives triple displays from any modern MacBook — including base M1/M2/M3/M4/M5 MacBook Air models Apple limits to one screen
- ✅ Works over a standard USB-C connection — no Thunderbolt required
- ⚠️ Requires a DisplayLink driver installed and running on macOS
- ❌ DRM-protected streaming content (Netflix, Disney+, HBO) won’t play on DisplayLink screens
If you can live with that streaming limitation — and most productivity users can — this dock is exceptional value. If you watch a lot of streamed content on your external monitors, read the gotchas section carefully before buying.
Full Port Specifications
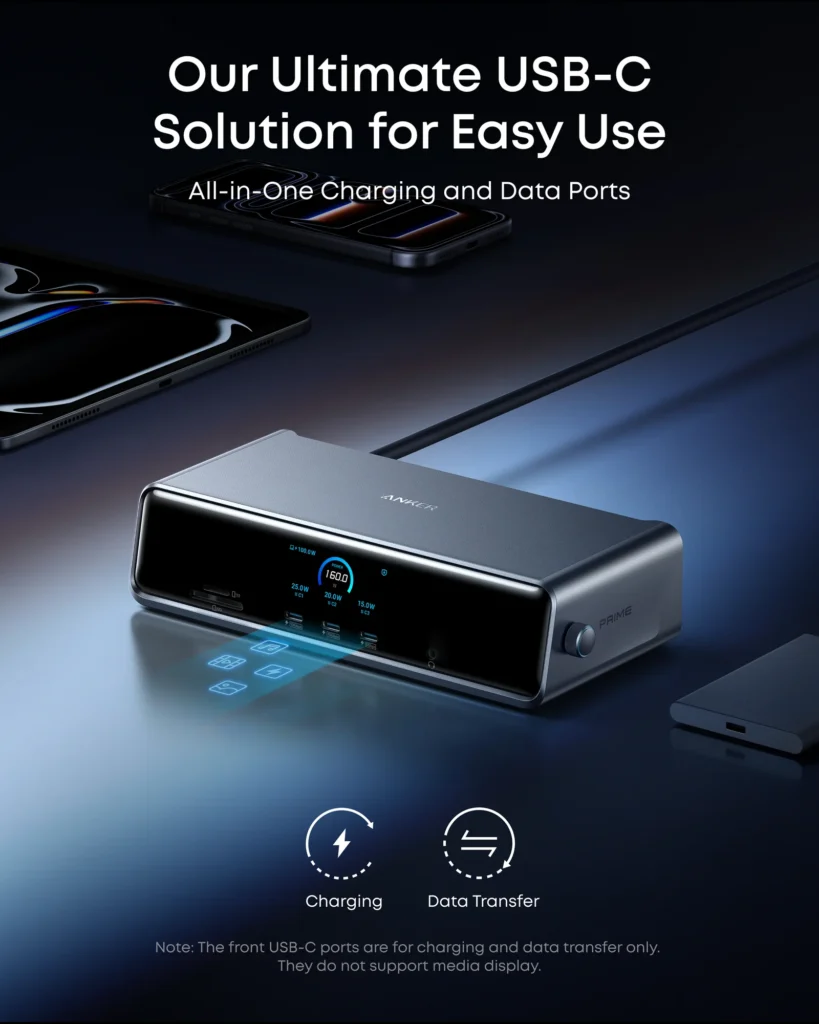
The A83B3 packs 14 ports into a chassis measuring 7.68 × 3.62 × 1.85 inches. Here’s every port, what it does, and what Mac users specifically need to know:
| Port | Speed / Power | Mac Notes |
|---|---|---|
| USB-C Upstream ×1 | 10 Gbps · 140W PD 3.1 | Connect to your MacBook. Charges up to 140W — enough for 16″ MBP. Requires PD 3.1 on MacBook for max charging. |
| DisplayPort 1.4 ×1 | 8K@60Hz | Best display output on the dock. Use for your highest-res monitor. Requires DisplayLink driver on Mac. |
| HDMI 2.1 ×2 | 8K@30Hz / 4K@60Hz | Both require DisplayLink. For 8K, only supports YCbCr 4:2:0 — use 4K@60Hz for best quality. HDMI ports cannot do 5K or 6K. |
| USB-C ×2 (front) | 10 Gbps · 100W each | Charging and data only — no video output from front ports. |
| USB-C ×1 (rear) | 5 Gbps · 100W | Good for keyboards, drives, slower peripherals. |
| USB-A ×2 | 5 Gbps · 4.5W | Mice, keyboards, USB drives. |
| USB-A ×1 | 480 Mbps · 2.5W | USB 2.0 speed — fine for input devices. |
| Ethernet ×1 | 2.5 Gbps | Full 2.5Gbps with no Mac throttling — major upgrade over older DisplayLink docks. |
| SD + microSD ×1 each | UHS-I · 104 MB/s max | Works reliably. Not UHS-II, so MacBook Pro users won’t gain over the built-in SD slot. MacBook Air users get a real upgrade here. |
| 3.5mm Audio ×1 | Combo jack | Works on Mac. Set output in System Settings → Sound → Output → Anker 3.5mm Audio. |
Total system output: 160W max across all ports simultaneously.
How to Set It Up on a Mac
Unlike native Thunderbolt docks, this one requires a one-time software setup. It took me about four minutes and I’ve never needed to think about it since.
Step 1: Connect power and plug in via USB-C
Connect the included USB 3.1 Gen 2 cable from the dock’s upstream port to your MacBook. The dock’s front digital screen lights up immediately.
Step 2: Download and install DisplayLink Manager
Visit anker.com/a83b3 and download the macOS DisplayLink Manager installer. This free app is what drives the external monitors — the displays won’t work without it running.

Step 3: Grant Screen Recording permission
Go to System Settings → Privacy & Security → Screen Recording and enable DisplayLink Manager. This is how the software renders content to your external monitors. Anker explicitly confirms no data is recorded or saved — it’s purely a rendering requirement of the macOS API.
Step 4: Connect your monitors
Plug monitors into the two HDMI 2.1 ports and/or the DisplayPort. The dock’s screen will display resolution and refresh rate for each connected display automatically.
Step 5 (Optional): Install Anker Dock Manager
The companion desktop app gives you real-time charging status per port, firmware updates, display configuration, and fault diagnostics in one dashboard. Download at anker.com/dockmanager-download.
Important: Always keep DisplayLink Manager running while the dock is connected. If it quits, your external displays will stop working. macOS 13.5 (Ventura) or later is required.
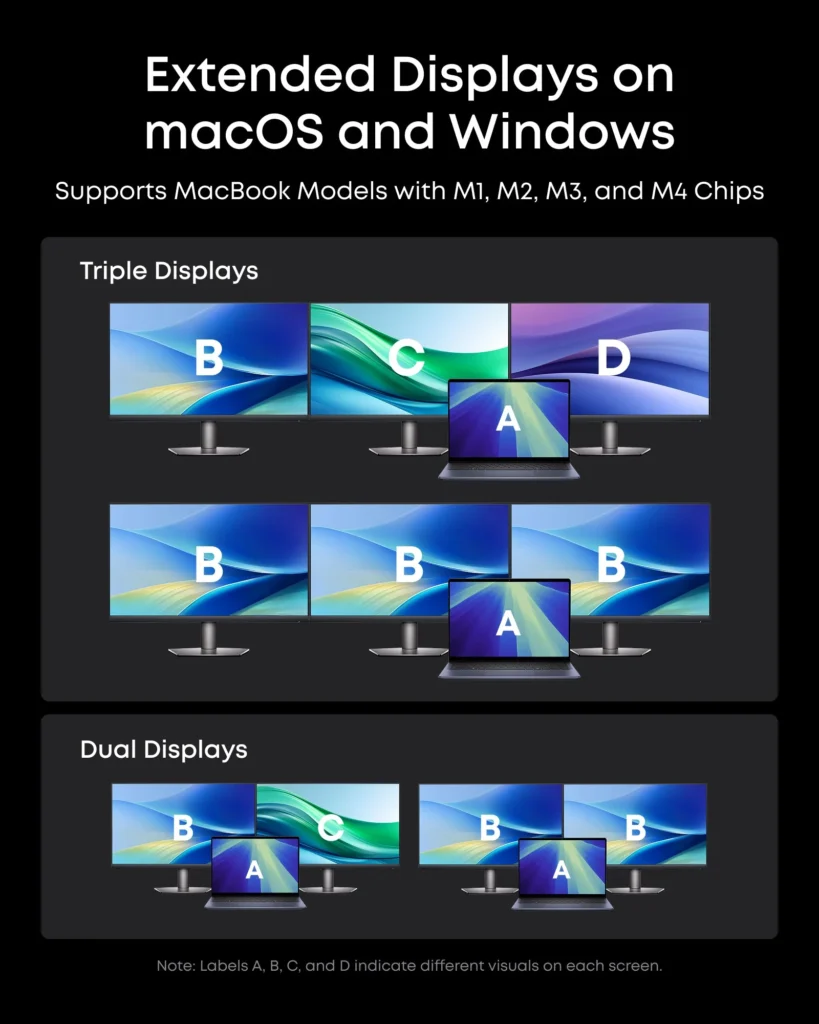
Display Performance and Resolution
Triple Displays on Every M-Series MacBook
This is the headline feature — and it genuinely delivers. Because DisplayLink uses software-based rendering over USB rather than native Thunderbolt signals, it bypasses Apple’s hardware display limits entirely. Every M-series MacBook gets triple-display support with this dock, regardless of chip generation.
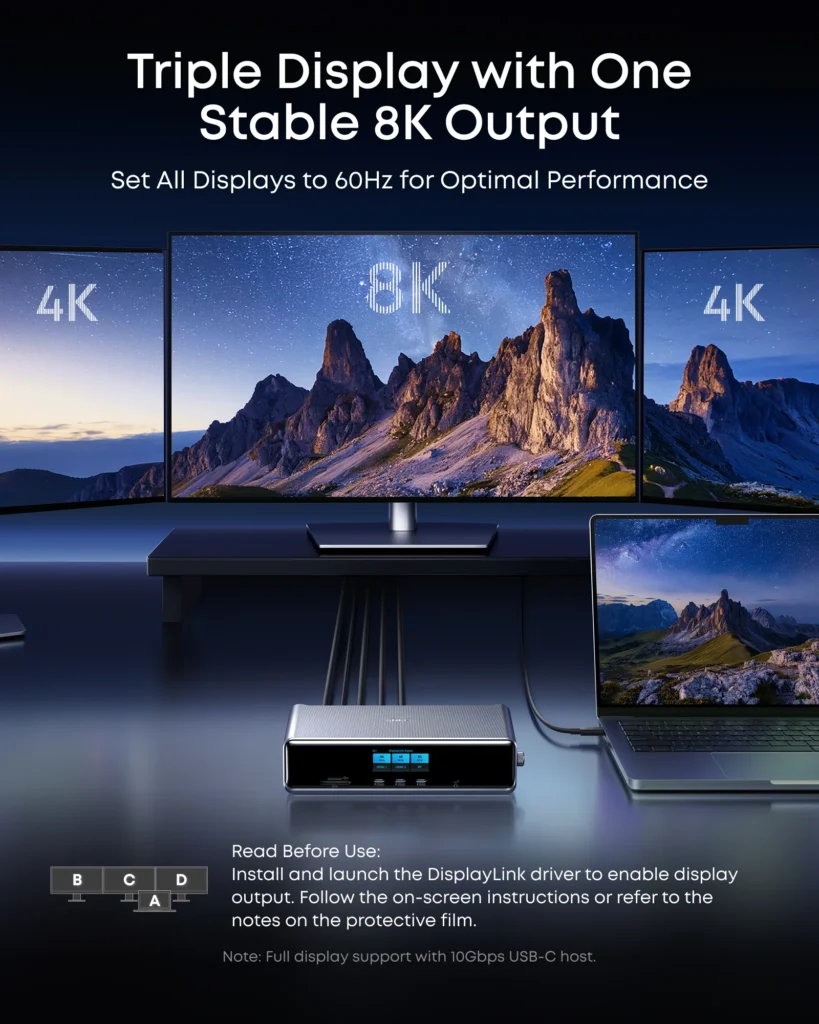
Video Resolution Reference Table
| Monitor Configuration | HDMI 1 | HDMI 2 | DisplayPort |
|---|---|---|---|
| Single monitor | 8K@30Hz | — | 8K@60Hz |
| Dual monitors | 4K@60Hz | 4K@60Hz | — |
| Dual monitors (mixed) | 4K@60Hz | — | 8K@60Hz |
| Triple monitors | 4K@60Hz | 4K@60Hz | 8K@60Hz |
Note: All outputs require the DisplayLink driver on macOS. HDMI ports do not support 5K or 6K resolution. For 8K over HDMI, only YCbCr 4:2:0 format is supported — 4K@60Hz is recommended for best image quality.
DisplayLink vs. Native: What You’ll Actually Notice
For everyday productivity — writing, coding, Figma, spreadsheets, Slack, video calls — DisplayLink is seamless. I ran a triple-display setup across several weeks without any visual issues. Where you may notice a difference:
- GPU-intensive work (3D rendering, 4K timeline scrubbing, gaming): slightly higher CPU usage compared to native Thunderbolt output
- Streaming content: DRM-protected video goes black on all DisplayLink-connected screens (see Gotchas section)
Mac Compatibility: Every M-Series Model Covered
This is the section I’d tell every buyer to read before purchasing. What you get from this dock depends heavily on which MacBook you have.
| MacBook Model | TB Version | Native Max Displays | With This Dock | Charging | Verdict |
|---|---|---|---|---|---|
| MacBook Air M1 | TB4 | 1 external | 3 displays (DisplayLink) | Up to 30W | ✅ Big Upgrade |
| MacBook Air M2 | TB4 | 1 external | 3 displays (DisplayLink) | Up to 67W | ✅ Big Upgrade |
| MacBook Air M3 | TB4 | 2 (lid closed) | 3 displays (DisplayLink) | Up to 67W | ✅ Big Upgrade |
| MacBook Air M4 | TB4 | 2 external | 3 displays (DisplayLink) | Up to 100W | ✅ Good Match |
| MacBook Air M5 | TB4 | 2 external | 3 displays (DisplayLink) | Up to 100W | ✅ Good Match |
| MacBook Pro M1 Pro/Max | TB4 | 2–4 external | 3 displays | Up to 140W | ✅ Good Match |
| MacBook Pro M2 Pro/Max | TB4 | 2–4 external | 3 displays | Up to 140W | ✅ Good Match |
| MacBook Pro M3 Pro/Max | TB4 | 2–4 external | 3 displays | Up to 140W | ✅ Good Match |
| MacBook Pro M4 Pro/Max | TB5 | 2 external | 3 displays | 140W PD 3.1 | ✅ Good Match |
| MacBook Pro M5 Pro | TB5 | 3 external (native) | 3 displays | 140W PD 3.1 | ⚠️ Redundant for displays |
| MacBook Pro M5 Max | TB5 | 4 external (native) | 3 displays | 140W PD 3.1 | ❌ Dock limits you |
| Intel MacBook (any) | TB3 | Varies | Partial only | Limited | ❌ Not Recommended |
MacBook Air M1 / M2 / M3 — Biggest Value Here
Apple hardware-limits all base-chip MacBook Air models to a single external display. This dock bypasses that restriction entirely through DisplayLink, giving you a full triple-display productivity setup. I tested it on an M2 Air — all three screens came up cleanly with no issues. For Air users, this dock delivers the most meaningful real-world upgrade.
MacBook Air M4 / M5 — Solid Choice
The M4 and M5 Air already support two displays natively. This dock adds a third via DisplayLink. Whether that third screen is worth $300 depends on your workflow — but the 100W charging and 2.5Gbps Ethernet alone make this a strong hub candidate regardless.
MacBook Pro M1–M4 Pro and Max — Well-Matched
You already have multi-display support. What this dock adds is triple displays + 140W charging through a single cable, plus 2.5Gbps Ethernet and a full port suite. The one-cable desk experience is genuinely transformative once you have it. The streaming limitation is the main consideration.
MacBook Pro M5 Pro — Diminishing Returns on Displays
The M5 Pro already supports three displays natively over Thunderbolt 5. This dock can still drive three screens — but you’re paying for DisplayLink redundancy. If triple displays are your main goal, the Anker TB5 dock or a CalDigit TS5 Plus will give you native rendering without DRM limitations. That said, the 140W charging and port consolidation still justify this dock if you need the hub functionality.
MacBook Pro M5 Max — Look Elsewhere for Displays
The M5 Max supports four external displays natively. This dock only provides three video outputs — you would actually be limited by the dock, not your Mac. If you need all four screens, consider the iVANKY FusionDock Ultra or CalDigit TS5 Plus instead.
Intel MacBook — Not Recommended
DisplayLink video output is not guaranteed on Intel Macs, and the dock is not officially optimized for them. Anker’s listed compatibility is macOS 13.5 or later on Apple Silicon. Intel Mac users would also need separate Realtek drivers for Ethernet to function correctly.
Power Delivery and Charging
140W PD 3.1: No Second Cable Needed
Removing my MacBook’s separate power brick from the desk permanently was the most immediately satisfying thing about daily use of this dock. The upstream USB-C port delivers 140W at PD 3.1, which fast-charges a 16-inch MacBook Pro from 0 to 100% in approximately 1.5 hours.
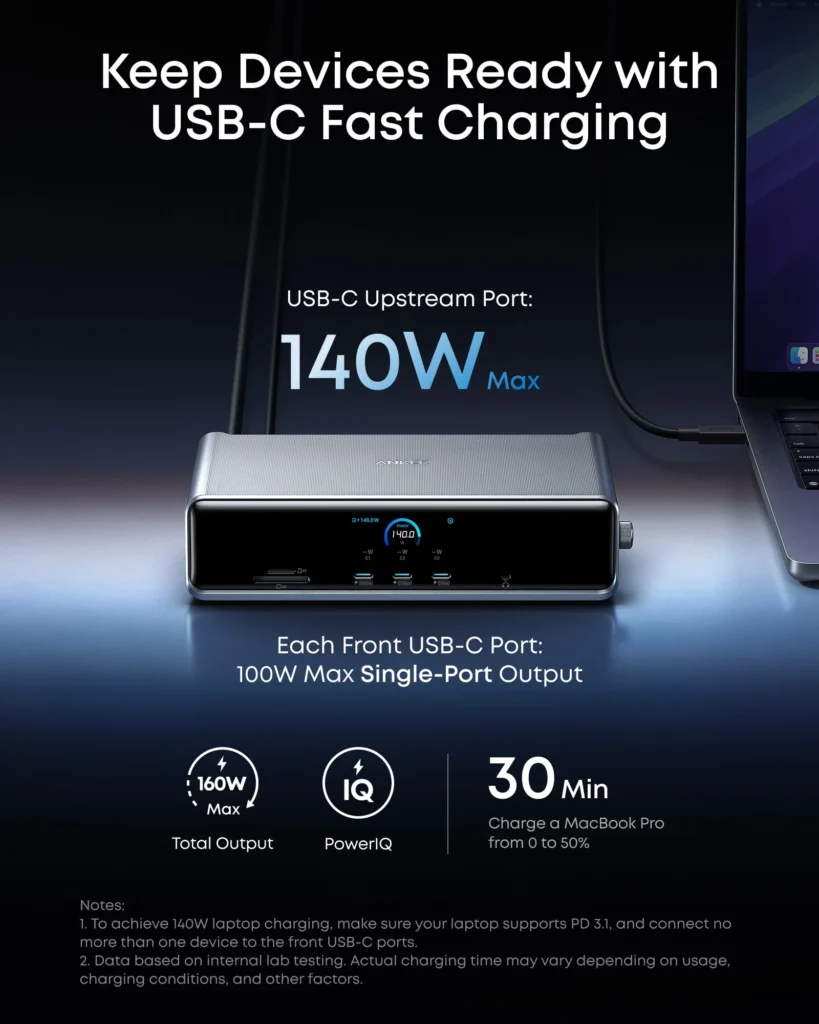
| Port | Maximum Output |
|---|---|
| Upstream (laptop) | 140W PD 3.1 |
| USB-C front ×2 | 100W each |
| USB-C rear ×1 | 100W |
| USB-A ×2 | 4.5W each |
| USB-A ×1 | 2.5W |
| Total dock output | 160W max |
Pro tip: To maintain the full 140W to your MacBook, limit front USB-C port connections to one device at a time while charging. The dock redistributes power intelligently, but the ceiling drops slightly under simultaneous high-watt loads.
The dock requires PD 3.1 support on your MacBook for the full 140W. Most recent MacBook Pro models support it; MacBook Air models typically see 67W–100W in practice, which is still enough to charge comfortably during use.
Smart Display Panel and Knob Controls
The front-facing digital screen is one of the most practical features of this dock — and something I use daily without even thinking about it.
What the Screen Shows
- Charging Status: Real-time wattage for the host port and all USB-C ports. Press the knob to see voltage, current, and maximum supported charging speed per port.
- Display Status: Brand, size, resolution, and refresh rate for each connected monitor. Appears automatically when a display is detected.
- Performance Mode: Color-coded fan status — blue (fan off), green (fan level 1), orange (fan level 2). The built-in cooling fan runs at approximately 32 decibels at full speed, which is quiet enough to not register over ambient room noise.
- Clock Screensaver: Once DisplayLink is connected and running, the dock displays a clock when idle. Style, timeout duration, and 12/24-hour format are all configurable.
Knob Controls
The physical knob on the front lets you navigate the display without opening any app:
- Rotate: Move between options
- Press once: Select or confirm
- Hold 2 seconds: Turn off the screen (dock stays active)
- Hold 5 seconds: Power off the dock
What I Didn’t Like (Honest Gotchas)
1. Streaming Content Won’t Play on DisplayLink Screens
Netflix, Disney+, HBO Max, Amazon Prime Video, Apple TV+, and YouTube TV all display a black screen when any DisplayLink monitor is connected — audio plays, but video doesn’t. This is a macOS/DisplayLink architectural issue related to how the OS handles DRM and screen capture permissions. It is not a bug Anker can easily fix.
Workaround: Disable hardware acceleration in Google Chrome or Microsoft Edge (Settings → System → disable “Use hardware acceleration when available”, then relaunch). Firefox and Safari do not support this workaround.
2. SD Card Slots Can Lose Connection After Sleep
Twice during testing, the SD and microSD slots stopped responding after the Mac woke from sleep. A power cycle on the dock resolved it immediately; restarting the MacBook cleared it permanently. This is likely firmware-addressable — keep the dock updated via Anker Dock Manager.
3. Front USB-C Ports Cannot Output Video
This trips people up. The two front USB-C ports are charging and data transfer only. All three video outputs are on the rear panel: HDMI 1, HDMI 2, and DisplayPort.
4. DisplayLink Manager Must Stay Running
If DisplayLink Manager quits or is force-quit, all three external displays stop working until you relaunch it. It launches at login by default, but worth knowing if you’re troubleshooting display issues.
5. UHS-I Card Readers Only
At $299, UHS-I (104 MB/s max) card readers feel like a cost-cutting measure. Competing docks at similar price points offer UHS-II at 312 MB/s. MacBook Pro users already have a faster built-in SD slot. MacBook Air users get a win here regardless.
6. M5 Max Display Ceiling
If you own an M5 Max MacBook Pro, Apple gives you four native external displays over a single Thunderbolt port. This dock only supports three video outputs. For M5 Max users who need all four screens, the dock becomes the bottleneck — not the Mac.
Pros and Cons Summary
What I Loved ✅
- Triple displays on every M-series MacBook — including base-chip Air models Apple limits to one screen
- 140W PD 3.1 charging — no separate power brick, fast-charges even the 16″ MacBook Pro
- True 2.5Gbps Ethernet with no Mac throttling
- Smart display screen shows real-time charging and display data — genuinely useful daily
- One cable desk — power, three monitors, Ethernet, and all peripherals through one USB-C connection
- DisplayPort drives 8K@60Hz — best single-display output available at this price point
- Active cooling — quiet fan (~32dB) keeps the dock running cool under load
- Anker Dock Manager app is polished and handles firmware updates cleanly
- Screen Recording permission is privacy-safe — no data collected or transmitted
What I Didn’t Like ❌
- Requires DisplayLink driver installation and macOS Screen Recording permission
- DRM streaming blocked on DisplayLink screens (Netflix, Disney+, etc.)
- UHS-I card readers only — slow compared to competitors and built-in MacBook Pro SD slot
- SD card slots can drop after sleep — requires power cycle (firmware fixable)
- Not compatible with Intel MacBooks
- M5 Max users are limited to 3 displays (dock constraint, not Mac constraint)
- Front USB-C ports are charging/data only — no video output
Final Verdict: Who Should Buy This?
The Anker Prime DisplayLink Docking Station is the definitive answer to Apple’s multi-monitor limitations for MacBook Air users, and a practical single-cable hub for most MacBook Pro owners. The DisplayLink approach has real tradeoffs — driver setup and no DRM streaming — but the triple-display capability it unlocks for every M-series Mac is genuinely impressive at this price.
Buy This Dock If:
- You own a MacBook Air (any M-chip) and want two or three external displays
- You own any MacBook Pro M1 through M4 and want triple displays plus full charging through one cable
- You work primarily in productivity apps (not streaming) on your external screens
- You want 2.5Gbps Ethernet without Mac speed throttling
Consider the Anker TB5 Dock Instead If:
- You own an M4 Pro, M4 Max, M5 Pro, or M5 Max MacBook Pro and want native rendering without DisplayLink
- You regularly stream DRM content (Netflix, Disney+) on external monitors
- You want maximum data bandwidth for Thunderbolt 5 SSDs
Look at CalDigit TS5 Plus or iVANKY FusionDock Ultra If:
- You own an M5 Max and need all four native external displays
- You need more than three displays or require UHS-II card reader speeds
Skip This Dock If:
- You’re on an Intel MacBook
- You need to stream Netflix or similar on your external displays and are unwilling to use the Chrome hardware acceleration workaround
Review based on hands-on testing, the official A83B3 user manual, and anker.com/products/a83b3. All product images courtesy of Anker. Specifications sourced from the official manual and product page.
Affiliate disclosure: This review does not contain affiliate links. No compensation was received from Anker for this review.