Last Updated: May 2026 | By Erdem Ugurluol | This article contains affiliate links. If you buy through them, I may earn a small commission at no extra cost to you.
The terms “USB-C hub” and “docking station” get used interchangeably in product listings, reviews, and even on the packaging itself — and that overlap causes real buying mistakes. People pick up a hub expecting it to run two monitors. People buy an expensive Thunderbolt dock when a $40 hub would have done the exact same job. And a lot of people spend an afternoon convinced their MacBook is broken when the real issue is simply that they bought the wrong category of product.
This guide explains what each one actually is, what the technical differences are, and which one makes sense for your specific Mac and setup.
The Short Answer First
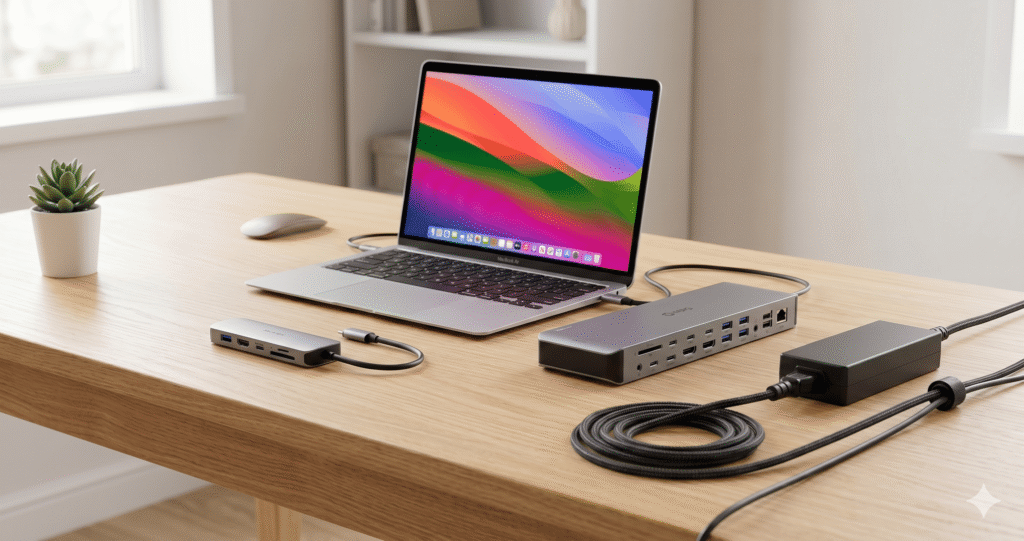
A USB-C hub is a small, usually bus-powered (no external power required) device that adds a handful of ports to your MacBook. Think of it as a port splitter. You get USB-A ports, maybe an HDMI output, an SD card slot, and pass-through charging. It sits in your laptop bag. It costs $30–$80. It’s designed for mobility and basic expansion.
A docking station is a larger, externally powered device that transforms your MacBook into a full workstation from a single cable. It handles multiple monitors, wired Ethernet, fast storage, audio, and charges your Mac at full speed — all simultaneously. It sits on your desk. It costs $80–$400. It’s designed for a permanent setup.
The confusion exists because the marketing language overlaps. Manufacturers call both things “docks” sometimes. Some hubs call themselves “docking stations.” This guide cuts through that and explains what these things actually do.
What a USB-C Hub Is — and What It’s Actually For
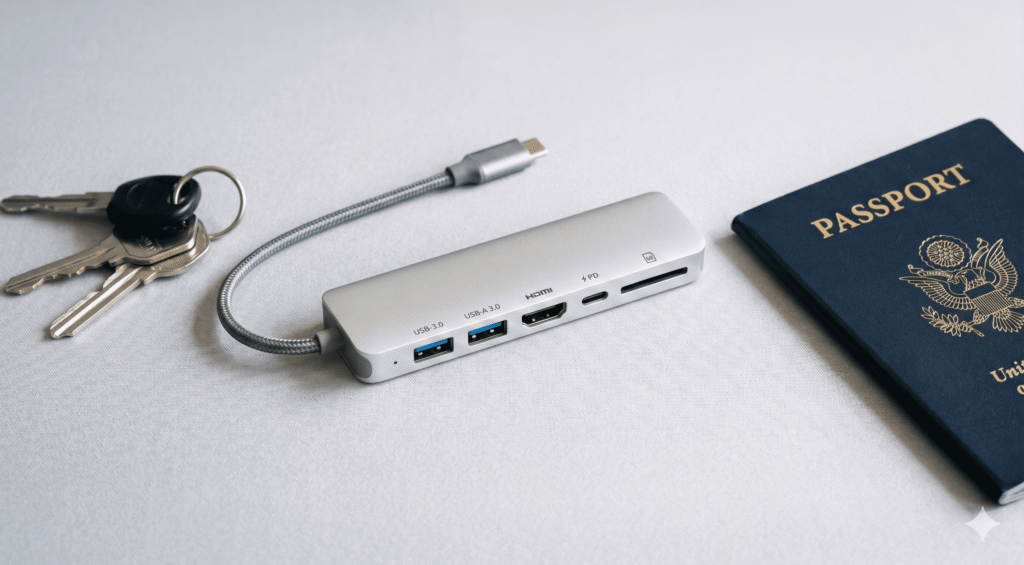
A USB-C hub is essentially a splitter. You plug one USB-C cable into your MacBook, and on the other end you get multiple ports that all share the bandwidth of that single USB-C connection.
The “sharing” part is critical. Everything going through the hub — the monitor signal, the keyboard data, the mouse data, the SD card read, the charging pass-through — all competes for the same bandwidth pipe. On a basic USB-C hub, that pipe is typically 5–10 Gbps. That sounds like a lot until you understand that a single 4K display at 60Hz consumes roughly 12 Gbps of bandwidth.
So when you plug a 4K monitor into a basic USB-C hub, you’re asking it to push more than the hub can handle. It either drops to 4K@30Hz, compresses the signal, or fails entirely. That’s not a bug. That’s physics.
Hubs are genuinely the right tool for travel, presentations, and any situation where you need a few extra ports temporarily — USB-A for a keyboard or drive, HDMI to a projector, pass-through charging. They’re bus-powered, weigh almost nothing, and take seconds to set up. But they’re not designed for a full desk setup, and they reach their ceiling quickly when you push them past the basics.
What a hub is good at
- Adding USB-A ports for devices your MacBook doesn’t have natively
- HDMI output for a single external display (4K@30Hz on basic hubs, 4K@60Hz on better ones)
- SD card reading for photo imports
- Pass-through charging (usually at reduced wattage — a 100W rated hub typically delivers 80–85W to your Mac)
- Travel and temporary setups
- Keeping the price down when you only have basic needs
What a hub is not good at
- Running two independent extended displays natively on Mac
- Delivering enough watts to charge a MacBook Pro 16-inch under load
- Sustained high-speed data transfers (external NVMe drives, video editing workflows)
- Staying cool under heavy sustained use — most plastic-bodied hubs overheat
- Acting as a permanent, stable desk setup
What a Docking Station Is — and What It’s Actually For
A docking station is a different category of product built on different technology. There are two types:
USB-C docking stations use DisplayPort Alternate Mode to carry video alongside data. They need an external power supply because they deliver more power than the laptop’s USB-C port can provide. They typically deliver one or two monitors (depending on the dock and your Mac’s chip), reliable Ethernet, multiple USB ports, audio, and SD card reading — all through one cable to your Mac.
Thunderbolt docking stations use the Thunderbolt protocol (TB3, TB4, or TB5) and offer 40–120Gbps of bandwidth — four to twelve times more than a basic USB-C hub. This bandwidth lets a Thunderbolt dock run multiple 4K monitors, saturate an external NVMe drive, deliver full charging wattage, and handle USB peripherals — all at the same time, without bandwidth conflicts.
Both types have external power supplies. Both are designed to stay on your desk. The difference is performance ceiling and price.
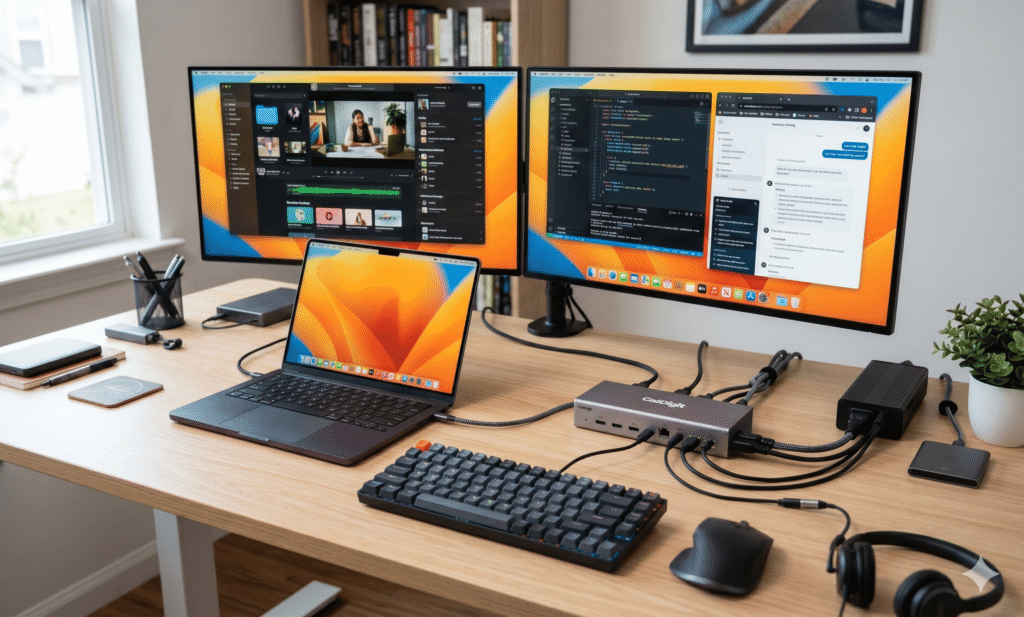
The defining value of a dock over a hub is the single-cable connection. You sit down, connect one cable to your Mac, and your entire desk setup activates — monitors, charging, Ethernet, keyboard, audio. That reduction in daily setup friction is genuinely what makes a dock worth buying for anyone who works from a fixed desk regularly.
What a docking station is good at
- Single-cable connection that activates your entire desk setup
- Multiple independent extended displays (with the right Mac chip)
- Full-speed charging — most docks deliver 96–140W to the Mac
- Gigabit or 2.5Gbps wired Ethernet, rock-solid and fast
- High-speed data through Thunderbolt (40–120Gbps on TB5 docks)
- External NVMe drives at proper read/write speeds
- Consistent, stable operation over months of daily use
- Better heat management — powered docks dissipate heat more effectively
What a docking station is not good at
- Travelling with it (most are too heavy and need a power brick)
- Cost — entry-level docks start around $80, quality TB4 docks are $130–$250, TB5 is $300–$400
- Casual one-off use — you don’t set up a dock for an occasional meeting room
The Technical Reason They’re Different
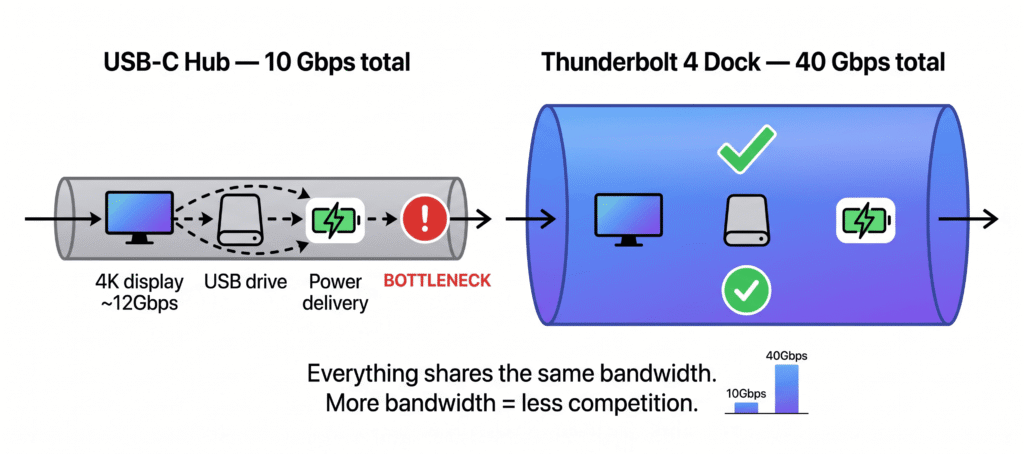
Every USB-C port has a maximum bandwidth — a fixed amount of data it can move per second. A basic USB-C 3.2 port moves 5–10 Gbps. A Thunderbolt 4 port moves 40 Gbps. A Thunderbolt 5 port moves 80–120 Gbps.
A hub or dock connects to your Mac through one USB-C port. Everything the hub or dock does — every monitor, every USB device, every file transfer, every charging watt — shares that one bandwidth pipe.
A 4K display at 60Hz requires approximately 12–15 Gbps of bandwidth just for the video signal. If your hub is only a 10 Gbps USB-C device, it literally cannot carry a 4K@60Hz signal. It’ll either drop to 4K@30Hz (which looks noticeably worse) or fail to display at all. Adding a second monitor is completely impossible at that bandwidth.
A 40 Gbps Thunderbolt 4 dock has enough headroom to carry two 4K@60Hz displays (roughly 24–30 Gbps total for video) and still have 10–16 Gbps left for data, peripherals, and power delivery simultaneously. That’s why the dock can do things the hub cannot — it’s not cleverness or software, it’s raw available bandwidth.
Why no setting or cable change can fix a hub’s display limit
This question comes up constantly in Mac communities: “I have a USB-C hub with two HDMI ports — how do I get two extended displays?” The answer is: you can’t. Not natively on Mac. Not with different cables. Not with a different setting in macOS.
A hub with two HDMI ports running on a 10 Gbps USB-C connection uses MST (Multi-Stream Transport) to split one DisplayPort signal into two HDMI outputs. This works on Windows. macOS doesn’t support MST for extended displays. Both outputs will mirror each other. The only way to get two truly independent extended displays on Mac through a single cable is with a Thunderbolt dock or a DisplayLink dock — and a DisplayLink dock requires driver installation.
This isn’t fixable with software. It’s a bandwidth and protocol limitation.
How Your Mac Model Changes Everything
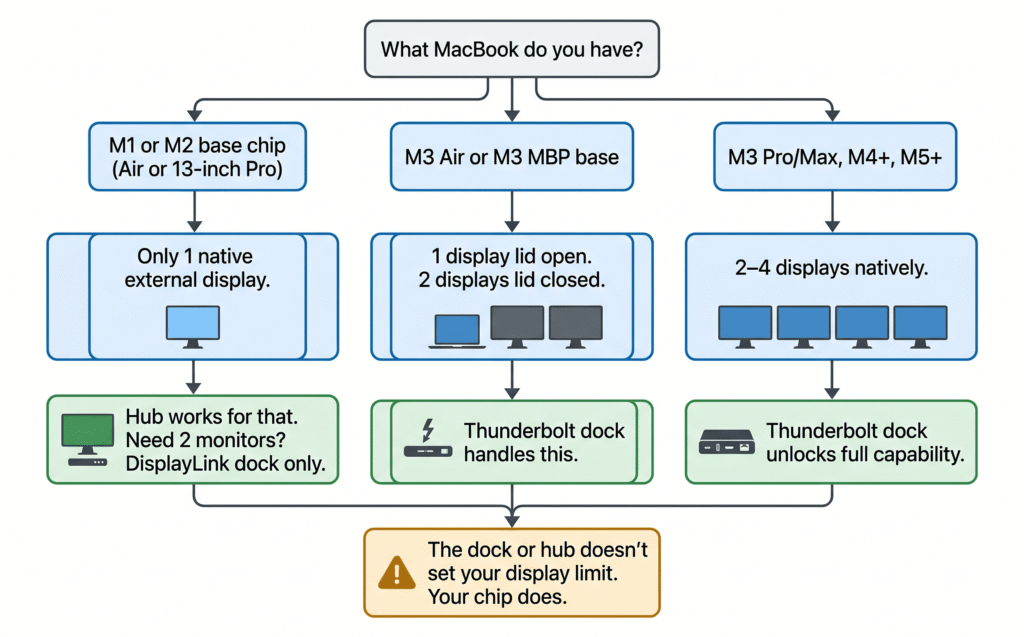
This is where Mac gets complicated — and where buyers make expensive mistakes. Your Mac’s chip determines how many external monitors it can drive, not the hub or dock you connect. A $400 Thunderbolt 5 dock cannot make a MacBook Air M1 drive two monitors natively. The chip is the ceiling.
Here’s how it breaks down practically:
MacBook Air M1 and M2 (13-inch and 15-inch)
Native external displays: 1
A USB-C hub is perfectly adequate if you need one monitor. Any hub with HDMI output will work. The second HDMI port on a dual-HDMI hub will mirror the first one.
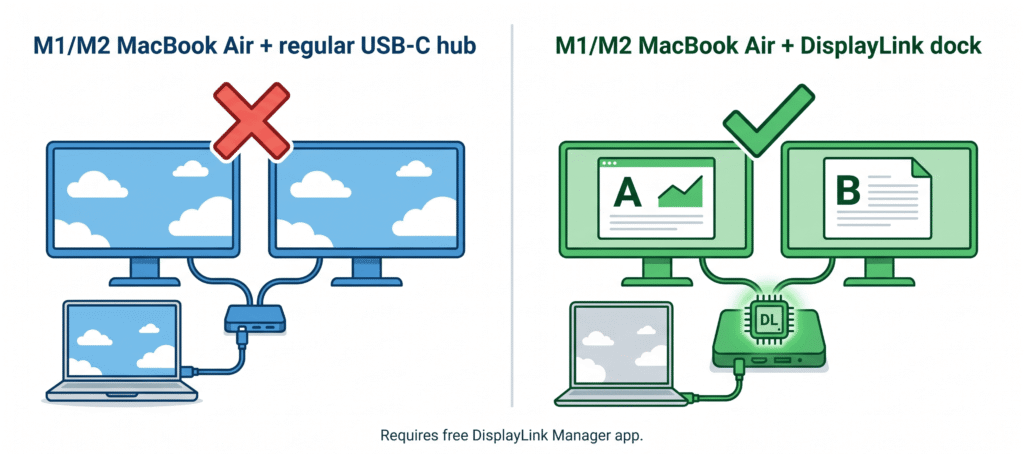
If you need two independent monitors: you need a DisplayLink dock — not a Thunderbolt dock, not a fancier USB-C hub. DisplayLink bypasses the chip’s hardware display limit by using your Mac’s CPU to render the second screen. It requires installing the free DisplayLink Manager app and has some trade-offs (DRM streaming shows a black screen on DisplayLink displays, slight CPU overhead).
Hub or dock?
- For one monitor + basics: a quality USB-C hub is fine and saves money
- For two monitors: a DisplayLink dock is the only solution
MacBook Air M3 (13-inch and 15-inch)
Native external displays: 1 with lid open / 2 with lid closed
M3 Air gained the ability to drive two external monitors — but only in clamshell mode (lid closed). A Thunderbolt dock handles this natively without any driver. Close the lid and both monitors come alive as independent extended displays. There’s no DisplayLink overhead. The trade-off is losing the built-in screen while in clamshell, which most people adapt to quickly.
Hub or dock?
- For one monitor with lid open: a hub works
- For two monitors in clamshell: you need a Thunderbolt dock
- For two monitors with lid open: DisplayLink dock only
MacBook Air M4 and M5
Native external displays: 2 (lid open or closed)
M4 Air is the first MacBook Air that works as a proper dual-monitor machine without any workaround. A Thunderbolt 4 dock connects, both monitors appear as independent extended displays, lid can stay open. No clamshell mode, no DisplayLink, no extra software.
Hub or dock?
- For one monitor + basics: a good USB-C hub does the job
- For two monitors: a Thunderbolt dock is the right call
MacBook Pro M1 Pro / M2 Pro / M3 Pro (14-inch and 16-inch)
Native external displays: 2 (plus built-in HDMI)
MacBook Pro Pro-chip models have three Thunderbolt ports and a built-in HDMI port. A Thunderbolt dock unlocks two monitors through the dock’s outputs, and the built-in HDMI drives a third. Three screens, no DisplayLink needed.
This is where the difference between a hub and a dock becomes most clear. A hub adds some ports, but a Thunderbolt dock genuinely expands the machine’s capability — turning a MacBook Pro into a workstation with three screens and full bandwidth for external NVMe storage simultaneously.
Hub or dock?
- For one monitor only: a hub covers it
- For two or three monitors: Thunderbolt dock
MacBook Pro M4 Pro / M4 Max / M5 Pro / M5 Max
Native external displays: 3–4 (Thunderbolt 5)
These chips have Thunderbolt 5 — 80Gbps standard, 120Gbps Bandwidth Boost. A Thunderbolt 4 dock still works at 40Gbps. A Thunderbolt 5 dock unlocks the full bandwidth, which matters for 8K displays, 4K@240Hz monitors, and external NVMe drives at their maximum rated speeds.
Hub or dock?
- Hub: technically works, but significantly underserves the machine
- Thunderbolt 4 dock: appropriate for most multi-monitor workflows
- Thunderbolt 5 dock: right choice for 8K, 4K@240Hz, or heavy NVMe use
Real Scenarios — Who Should Buy What
Scenario 1: The student or traveler
Profile: MacBook Air M4, mostly used in cafes and on the move. Occasionally plugs into a monitor at home. Travels with the laptop frequently.
A quality bus-powered hub covers everything this profile needs — USB-A ports for peripherals, HDMI for presentations or occasional monitor use, pass-through charging, SD card for camera imports. The Anker 8-in-1 or Selore 8-in-2 both handle this cleanly. They’re aluminum-bodied (important for heat dissipation), genuinely pocket-sized, and require no power outlet.
The main limitation hits when this user tries to connect a 4K monitor for proper desk use — a basic hub delivers 4K@30Hz, not 60Hz, which looks noticeably worse on a modern 4K panel. For occasional monitor use that’s tolerable. For daily use it becomes annoying.
Verdict: USB-C hub. Don’t overspend.
Budget: $35–$60
Scenario 2: The remote worker at a home office desk
Profile: MacBook Air M3 or M4, works from home 5 days a week. Has one or two monitors. Needs Ethernet for stable video calls. Uses keyboard and mouse.
This is the most common profile and the one where the hub-versus-dock distinction matters most practically. A hub technically works for one monitor — but an externally powered USB-C dock gives you Ethernet stability, proper charging speeds, clean cable management, and in the case of M4 Air, genuine dual extended display support. The TobenONE 18-in-2 handles the full setup at around $110. It’s not Thunderbolt, but for this workflow it doesn’t need to be.
Verify before buying that the dock explicitly says “extended display on Mac” — not just “dual 4K,” which may only mean extended on Windows.
Verdict: USB-C docking station with external power supply.
Budget: $80–$150
Scenario 3: The creative professional or developer
Profile: MacBook Pro M3 Pro or M4 Pro. Works with video, photography, or complex codebases across multiple screens. Uses external NVMe drives. Needs Ethernet. Has two or three monitors.
At this level, Thunderbolt bandwidth is a practical difference, not just a spec. A Thunderbolt dock on an M3 Pro or M4 Pro runs two 4K monitors while simultaneously saturating an external NVMe at 1,000+ MB/s — with bandwidth left over for Ethernet and USB peripherals. A USB-C dock at 10 Gbps starts to bottleneck under that same combined load, particularly visible in NVMe transfer speeds during video exports or large file operations.
The CalDigit TS4 at 18 ports and 98W PD is the benchmark for this profile. The UGREEN Revodok Max 213 covers similar ground at a lower price point if budget is a factor.
Verdict: Thunderbolt 4 dock. TB5 dock for M4 Pro/Max or M5 Pro/Max.
Budget: $130–$260 (TB4), $300–$400 (TB5)
Scenario 4: One monitor, keyboard, and mouse — nothing more
This is the most common overspending scenario. A MacBook Air M2 user buying a $250 Thunderbolt dock to run one monitor and connect a keyboard. Their M2 Air supports one external monitor — any hub or dock achieves that equally. The $250 dock works perfectly, but so does a $45 hub. There’s no practical difference for this specific use case.
The only reasons to choose a dock over a hub when you just need one monitor: you want Ethernet stability on the desk, you want the dock to fully charge a MacBook Pro 16-inch under load, or you simply prefer not having a power brick from a separate charger. Those are real reasons — but be honest about whether they apply before spending $200 more.
Verdict: Hub if you genuinely only need one monitor and basic peripherals. Dock only if Ethernet, charging speed, or cable management are real concerns.
Budget: $35–$70 for a hub, $80–$130 for a USB-C dock
The DisplayLink Exception — When Neither a Hub Nor a Basic Dock Works
There’s a third category specifically important for M1 and M2 MacBook Air users: the DisplayLink dock.
DisplayLink is a technology developed by Synaptics that encodes video as data and sends it over USB. The dock has a dedicated DisplayLink chip that decodes it and sends it to the monitor. Because it travels as data rather than a video signal, it bypasses the Mac’s hardware display limit entirely — meaning an M1 or M2 Air can drive two fully independent extended monitors.
The Plugable UD-6950PDH is the most consistently reliable DisplayLink dock for Apple Silicon, with driver support that holds up across macOS updates. The TobenONE DisplayLink triple monitor dock works well if three screens are needed.
The trade-offs:
- Requires installing the free DisplayLink Manager app — not plug-and-play like Thunderbolt
- DRM-protected streaming (Netflix, Disney+, Apple TV+) shows a black screen on DisplayLink displays — you can watch on the primary native display, just not the DisplayLink one
- Adds a small CPU overhead, roughly 5–15% extra per DisplayLink display
- Slightly lower color accuracy versus native Thunderbolt output — acceptable for productivity, not ideal for professional color work
For M1 and M2 Air users who need two monitors and are doing standard productivity work, DisplayLink is the right solution. The overhead is real but not noticeable in day-to-day use.
What to Check Before You Buy — The Practical Checklist
Before buying anything, run through this:
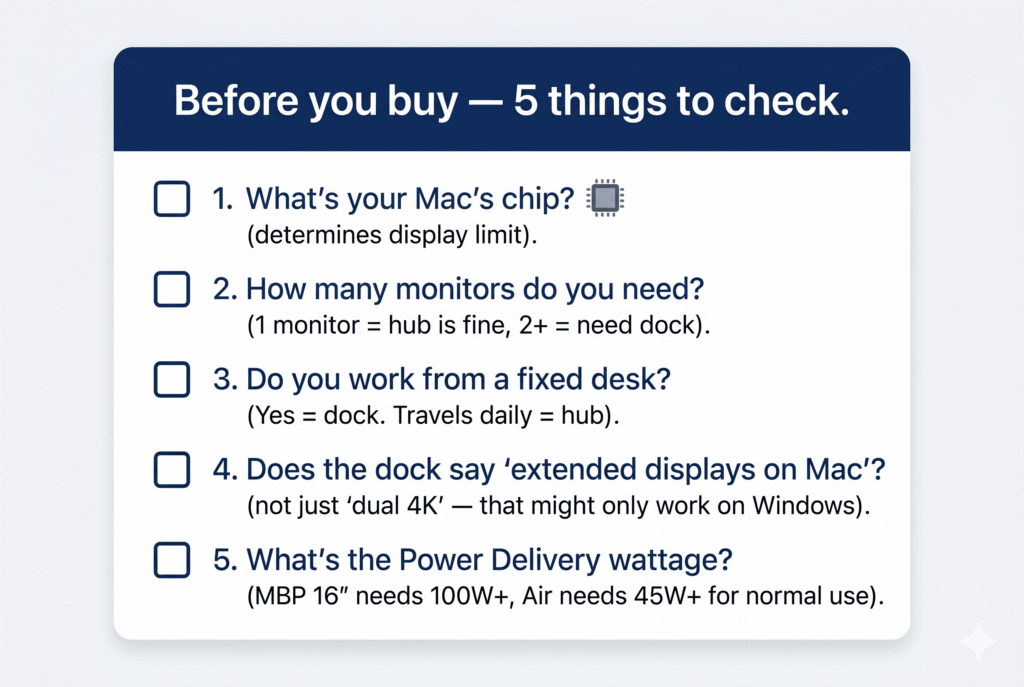
1. What chip is in your Mac? Apple menu → About This Mac → Chip. M1 or M2 with no suffix — one-display hardware limit. M3 with no suffix — one display lid open, two lid closed. M4/M5 base or any Pro/Max chip — multiple displays natively supported.
2. How many monitors do you actually need? Be honest. One great 4K monitor at 60Hz is more productive than two mediocre ones. If the answer is genuinely “one,” the hub/dock decision is much simpler.
3. Does the dock or hub say “extended display on Mac” explicitly? “Dual 4K” on the packaging means nothing on its own. Many “dual 4K” hubs and docks use MST (which only mirrors on Mac). Look for explicit Mac extended display support, Thunderbolt certification, or DisplayLink technology.
4. What Power Delivery wattage does it deliver to your Mac? Not the rated input — the delivered watts to the laptop. A dock rated at 100W input might only pass 60–70W after powering its own chips. MacBook Air needs 45W minimum. MacBook Pro 14-inch needs 67W. MacBook Pro 16-inch needs 100W for full-speed charging under load.
5. Where will you use it? Bag or desk? If the answer is both — buy both. A $45 hub for the bag, an $80–$130 dock for the desk. Together that’s often cheaper than a “travel dock” that compromises on both roles.
Head-to-Head: USB-C Hub vs USB-C Dock vs Thunderbolt Dock
| Feature | USB-C Hub | USB-C Dock (powered) | Thunderbolt 4/5 Dock |
|---|---|---|---|
| Bandwidth | 5–10 Gbps | 5–10 Gbps | 40–120 Gbps |
| External displays | 1 (Mac native limit) | 1–2 (Mac + chip dependent) | 2–4 (Mac chip dependent) |
| Charging delivery | 60–85W (pass-through) | 80–100W (dedicated power) | 96–140W (dedicated power) |
| Ethernet | Sometimes, Gigabit | Usually, Gigabit or 2.5G | Always, Gigabit to 10GbE |
| External NVMe speed | 350–500 MB/s | 350–500 MB/s | 1,000–6,000 MB/s |
| Driver needed | No | Sometimes (for dual display) | No (Thunderbolt is native) |
| Travel-friendly | ✓ Yes | Partial (needs power brick) | ✗ No (too heavy, needs brick) |
| Price range | $30–$80 | $80–$160 | $130–$400 |
| Best for | Travel, one monitor, basics | Home office, 1–2 monitors | Power users, multi-display, fast storage |
Common Mistakes to Avoid
Buying a Thunderbolt dock for an M1 Air expecting two monitors. Doesn’t work. The chip is the limit, not the dock. DisplayLink is the only solution for M1/M2 Air dual monitors.
Buying a “dual HDMI” hub expecting two extended displays on Mac. The two HDMI ports on most hubs use MST — they mirror on Mac. Not a defect. Not fixable with cables or settings. Just not compatible with macOS extended display mode.
Ignoring power delivery wattage. A hub that claims 100W PD may only deliver 65W to a MacBook Pro 16-inch after powering its own circuits. Under sustained heavy workloads, the battery can drain slowly despite being “plugged in.” Always check the delivered wattage, not the claimed input.
Buying a cheap plastic hub for sustained desk use. Plastic bodies hold heat in. Budget hubs run hot under sustained load and can start throttling after an hour — USB devices drop out, the display signal stutters. Metal-bodied hubs and docks dissipate heat properly. The build material matters.
Treating “USB-C dock” and “Thunderbolt dock” as interchangeable. Both plug into your USB-C port. Only Thunderbolt has the bandwidth to run two 4K monitors simultaneously without compromising external storage speeds. Know what you’re buying before committing.
Recommendations by Profile
For the student or traveler: Anker 8-in-1 USB-C Hub ($50) or Selore 8-in-2 USB-C Hub ($38). Both are bus-powered, aluminum-bodied, and reliable. Don’t buy the cheapest unbranded hub you find — they overheat and fail. These two don’t.
For the home office worker on MacBook Air M4/M5 (one or two monitors): TobenONE 18-in-2 MacBook Dock ($110) for best value, or UGREEN Revodok Max 213 ($130) for Thunderbolt 4. Both are powered docks that work cleanly on M4/M5 Air for dual extended monitors.
For the MacBook Air M1/M2 user who needs two monitors: Plugable UD-6950PDH ($150) — the most stable DisplayLink dock for Apple Silicon. Don’t try to make a Thunderbolt dock do this. Get the DisplayLink dock and install the driver.
For the MacBook Pro M3 Pro / M4 base / M5 base user: CalDigit TS4 ($250) for the premium option. UGREEN Revodok Max 213 ($130) for strong value. Both are Thunderbolt 4 and handle dual-monitor setups reliably.
For the MacBook Pro M4 Pro / M4 Max / M5 Pro / M5 Max user: Thunderbolt 5 dock. Plugable TBT5-UDZ ($300) for value. CalDigit TS5 Plus ($400) for the full premium experience. TB4 works on these machines, but if your workflow involves 8K displays, high-refresh 4K monitors, or heavy NVMe use, the TB5 bandwidth is genuinely used.
FAQ
Can I use a hub and a dock at the same time?
Yes, if your Mac has two Thunderbolt ports available. The combined display count and bandwidth still can’t exceed what your Mac’s chip supports. In practice, most users don’t need this — but it works.
My USB-C hub says “4K dual display” — why does it only mirror on Mac?
Almost certainly MST (Multi-Stream Transport). macOS doesn’t support MST for extended displays. The packaging is accurate for Windows users. For Mac, you need Thunderbolt or DisplayLink for two independently extended monitors.
Is a USB-C dock good enough for casual MacBook Pro use?
For most home office workflows — two monitors, Ethernet, keyboard, mouse, charging — yes. The bandwidth difference between a USB-C dock and Thunderbolt dock only becomes practically noticeable when you add heavy external NVMe transfers to an already full multi-monitor setup.
Does the hub or dock affect my Mac’s performance?
A Thunderbolt dock does not. A USB-C hub creates a mild bandwidth bottleneck that slows some operations slightly. A DisplayLink dock adds CPU overhead per display. None of these are dramatic for typical use, but they’re measurable.
Can I charge my MacBook through a hub?
Yes. Most hubs with Power Delivery pass-through charge your Mac. The caveat: the hub consumes some incoming power for its own operation, so a hub rated at 100W pass-through typically delivers 80–90W to your Mac. For MacBook Air, that’s plenty. For MacBook Pro 16-inch under sustained load, it may not be enough for full-speed charging.
Is an expensive hub worth it over a budget powered dock?
Rarely. Once you’re spending $70–$80 on a hub, basic powered USB-C docks exist at similar prices. Unless you specifically need the hub to be bus-powered for travel, a dock gives you better stability, Ethernet, and charging for comparable or lower cost.
The Bottom Line
A hub is a pocket tool — for travel, presentations, and temporary port expansion. It does that job well and nothing more. Buy a good one and don’t ask it to be your office.
A USB-C dock (powered) is the right foundation for a home office setup. It’s stable, capable of dual monitors on the right Mac, and doesn’t cost Thunderbolt prices. For most MacBook Air users, this is the correct choice.
A Thunderbolt dock is for power users who need three monitors, fast external storage, and a connection that doesn’t compromise under full load. It’s not overkill if your workflow actually uses what it provides.
A DisplayLink dock is the only solution for M1 and M2 Air users who need two independent monitors. It works — just install the driver and accept the DRM caveat.
The key point is this: the hub and dock don’t set the ceiling for your setup. Your Mac’s chip does. Everything else is about choosing the right tool to reach that ceiling efficiently.
All specifications are verified against manufacturer documentation and Apple’s official technical specs. Verified May 2026.