Last Updated: May 2026 | By Erdem Ugurluol | This article contains affiliate links. If you buy through them, I may earn a small commission at no extra cost to you.
DisplayLink is one of those Mac topics where half the people talking about it don’t fully understand what it is, and the other half are convinced it’s either a miracle solution or completely worthless. The reality is more useful than either extreme.
DisplayLink is a specific technology that solves a specific problem. It solves it reasonably well under the right conditions. Under the wrong conditions, it introduces new problems that didn’t exist before. Whether it belongs in your setup depends entirely on which Mac you have, how many monitors you need, and what you do on those monitors.
This guide explains everything: how DisplayLink actually works under the hood, which Mac models need it, which ones don’t, what it costs you in performance and convenience, and what alternatives exist for every scenario.
What Is DisplayLink, Actually?
DisplayLink is a technology developed by Synaptics (a semiconductor company) that enables a computer to drive an external monitor over a USB connection rather than through a native video output like Thunderbolt or HDMI.
Here’s what makes it different from every other display connection method on Mac:
Native display output (Thunderbolt, HDMI, DisplayPort) works like this: your Mac’s chip has dedicated display hardware — circuits called display engines — that generate the video signal and push it directly to the monitor. The process is hardware-accelerated, extremely efficient, and completely transparent to the operating system.
DisplayLink works like this: software on your Mac captures the display content, compresses it, and sends it as data over a USB connection to a dedicated DisplayLink chip inside the dock or adapter. That chip decompresses the signal and converts it back into a video output for the monitor. The display engine in your Mac chip is bypassed entirely.
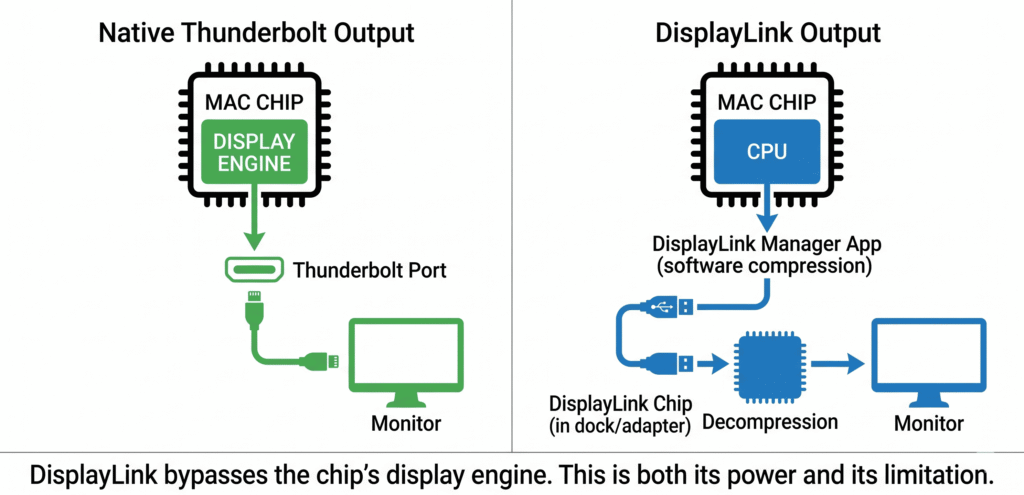
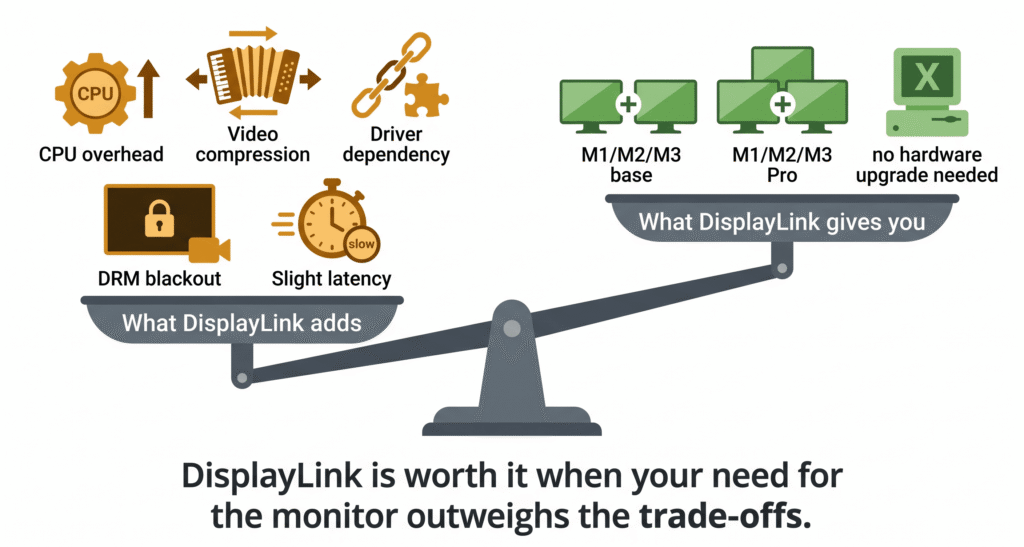
This bypass is both the power and the limitation of DisplayLink:
The power: Because it goes around the display engine, it works even when the Mac’s chip has no more native display outputs available. An M1 MacBook Air with one display engine left for external output can run three DisplayLink monitors in addition to that one native display — because DisplayLink uses the CPU, not the display engine.
The limitation: Using the CPU to process video adds computational overhead, introduces slight latency, uses image compression, and creates a dependency on a software driver that must always be running. It is not hardware-accelerated in the traditional sense.
Who makes DisplayLink?
DisplayLink was founded in Edinburgh, Scotland in 2003. Synaptics, the touchpad semiconductor company, acquired DisplayLink in 2021. The technology is licensed to dozens of dock and adapter manufacturers — Plugable, CalDigit, TobenONE, WAVLINK, Targus, Kensington, and many others all ship products with DisplayLink chips inside. The driver software (DisplayLink Manager) comes from Synaptics and is the same regardless of which brand’s dock you use.
Why DisplayLink Exists: The Mac Display Limit Problem
To understand why DisplayLink exists, you need to understand the constraint it was built to solve.
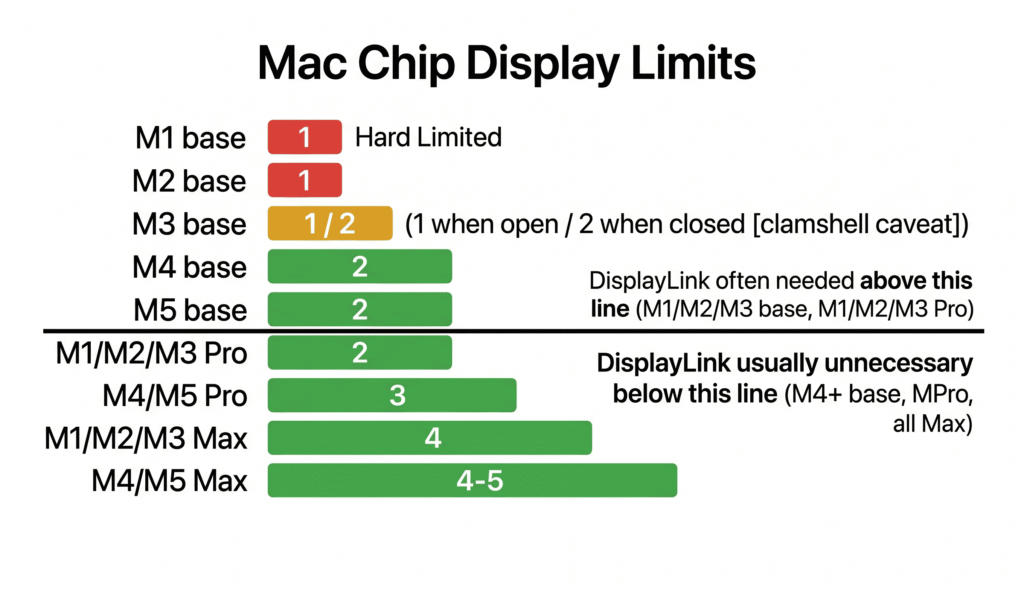
Apple Silicon chips — the M-series processors inside every current MacBook — have a fixed number of hardware display engines built directly into the silicon. These engines are the circuits that generate the video signal sent to external monitors. You cannot add display engines through software. You cannot unlock them with a firmware update. They are a physical part of the chip design.
Here’s what each chip generation natively supports for external monitors:
| Chip | Native External Displays | Caveats |
|---|---|---|
| M1 base | 1 | Hard limit — no workaround except DisplayLink |
| M2 base | 1 | Hard limit — no workaround except DisplayLink |
| M3 base | 1 (lid open) / 2 (lid closed) | Clamshell for 2nd display; macOS Sonoma 14.3+ required |
| M4 base | 2 | Lid open or closed, no workaround needed |
| M5 base | 2 | Lid open or closed, no workaround needed |
| M1 Pro / M2 Pro / M3 Pro | 2 | Plus built-in HDMI for a 3rd display |
| M4 Pro / M5 Pro | 2–3 | Thunderbolt 5, M5 Pro first to hit 3 natively |
| M1 Max / M2 Max / M3 Max | 4 | Plus built-in HDMI — up to 5 total |
| M4 Max / M5 Max | 4 | TB5, plus HDMI — up to 5 total |
This is why DisplayLink was adopted so heavily in the Mac community starting with M1. Apple chose display engine counts that were fine for the vast majority of users but left a meaningful gap for anyone needing more than one external monitor on a base chip Mac.
The M1 and M2 situation was particularly painful
When M1 launched in November 2020, it brought stunning performance — but the base M1 chip supported only one external display. Users who had been running two monitors on their Intel MacBook found they simply couldn’t on M1 without a workaround. DisplayLink was, and remains, the primary solution.
M2 repeated the same limit. M3 added the clamshell workaround but not full open-lid dual-monitor support. It wasn’t until M4 in 2025 that Apple gave the base MacBook Air genuine lid-open dual monitor support natively, finally closing the gap that DisplayLink had been filling for four years.
How to Install DisplayLink on Mac: Step by Step
Installing DisplayLink is a one-time process. After initial setup, it runs automatically in the background.
What you need before starting:
- A Mac running macOS Big Sur 11.0 or later (DisplayLink Manager supports Big Sur through the latest macOS Sequoia)
- A dock or adapter that includes a DisplayLink chip — verify this in the product listing before buying
- Admin access to your Mac (you’ll need your admin password)
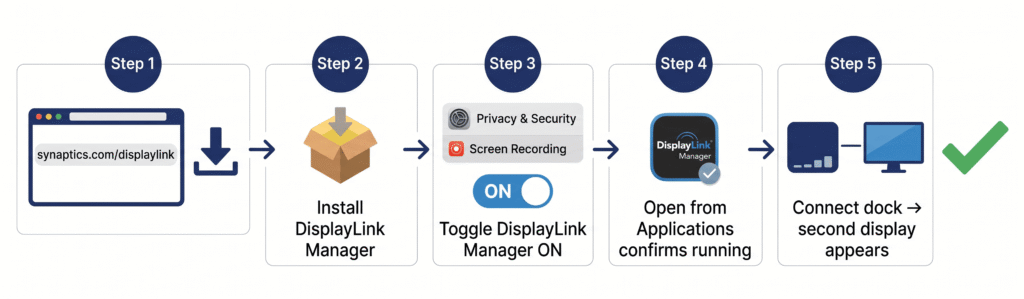
Step 1: Download DisplayLink Manager Go to synaptics.com/products/displaylink-graphics/downloads/macos and download the latest version of DisplayLink Manager for macOS. As of May 2026, the current version is 1.12.x. Download the ZIP file and open it.
Step 2: Install the application Run the installer package inside the ZIP. Enter your admin password when prompted. The app installs to your Applications folder.
Step 3: Grant Screen Recording permission — this is critical Open System Settings → Privacy & Security → Screen Recording. Find “DisplayLink Manager” in the list and toggle it ON.
This permission confuses many users. macOS shows this as “screen recording” access, which sounds alarming. DisplayLink Manager is not recording your screen. It needs pixel-level access to capture the display content it’s going to compress and send to the monitor. Without this permission, DisplayLink displays will be blank or non-functional.
Step 4: Enable auto-launch Open DisplayLink Manager from Applications. Click the DisplayLink icon in your menu bar → click the gear icon → enable “Launch automatically after logging in.” If you skip this step, DisplayLink won’t start after a restart and your second monitor will be blank.
Step 5: Connect your dock and monitor Plug the dock’s USB-C cable into your Mac. Connect your second monitor to the dock’s DisplayLink output. The display should appear in System Settings → Displays as an extended screen.
If the display doesn’t appear:
- Confirm Screen Recording permission is enabled and DisplayLink Manager is running (look for its icon in the menu bar)
- Disconnect and reconnect the dock cable
- Check that your dock actually has a DisplayLink chip — not all docks do, and installing the driver on a non-DisplayLink dock does nothing
The Real Performance Trade-offs
This is the section most DisplayLink guides skip or minimize. Understanding the trade-offs honestly is the difference between setting up a DisplayLink display that works well for your workflow and setting up one that frustrates you every day.
Trade-off 1: CPU overhead — how much and when it matters
DisplayLink uses your Mac’s CPU to compress display content before sending it over USB. The overhead varies with what’s happening on screen:
- Static content (spreadsheets, documents, code editors, email): DisplayLink compression is extremely efficient. Frame-to-frame changes are minimal, so very little compression work is needed. CPU overhead in these scenarios is typically 2–5% — genuinely negligible.
- Moderate motion (web browsing with smooth scrolling, casual video calls, UI animations): Overhead rises to approximately 8–15%. Still acceptable for most users, though some notice that scrolling through web pages feels slightly less smooth than on a native display.
- Heavy motion (video playback at 4K, fast-scrolling development environments with syntax highlighting, animations): Overhead can reach 20–35% per DisplayLink display. Users with demanding development workflows — particularly those who scroll through large codebases with syntax highlighting — have reported that DisplayLink makes their development environment noticeably less smooth.
- Multiple DisplayLink displays simultaneously: Each additional DisplayLink monitor multiplies the overhead. One DisplayLink display at moderate use: 10–15% CPU. Two DisplayLink displays at moderate use: 20–30%. Four DisplayLink displays: can push 50–80% CPU usage on older base-chip Macs.
Trade-off 2: Compression artifacts and image quality
DisplayLink compresses the video signal before sending it over USB. This compression is lossy — it discards some visual information to fit the signal within the available USB bandwidth.
For most productivity content — text, spreadsheets, code, email, presentations — the compression is transparent. You won’t notice any quality difference compared to a native display.
For content where image quality matters — photo editing, video color grading, graphic design — the compression introduces subtle artifacts that professionals notice. Color accuracy is lower than native Thunderbolt output. Fine gradients show banding. Sharp edges show minor compression noise. DisplayLink is not suitable as a primary display for color-critical work.
Trade-off 3: Latency and input lag
Because DisplayLink compresses content, sends it over USB, then decompresses it in the dock’s chip, there is additional latency compared to native display output. The exact latency varies by hardware and content, but it’s typically in the range of 1–3 additional frame delays.
For productivity work, this is imperceptible. For content creation where you’re watching video playback or previewing motion effects, it’s occasionally noticeable. For gaming, it’s a real problem — mouse-tracking lag on DisplayLink displays makes precision gaming uncomfortable for most players.
Trade-off 4: DRM streaming blackout
macOS’s content protection system (HDCP) treats DisplayLink displays as screen-sharing surfaces. As a result, DRM-protected streaming services — Netflix, Disney+, Apple TV+, Hulu, Amazon Prime Video — detect the DisplayLink display and show a black screen instead of content.
This protection cannot be bypassed. It’s not a DisplayLink driver issue or a dock firmware issue — it’s macOS implementing content protection at the OS level.
The practical impact: You cannot watch Netflix on a DisplayLink monitor. You can watch it on your MacBook’s built-in screen or on a natively Thunderbolt-connected monitor while simultaneously having the DisplayLink monitor for other apps. For many users this isn’t a problem — they don’t watch streaming on secondary monitors. For others it’s a dealbreaker.
Trade-off 5: Driver dependency and macOS update risk
DisplayLink requires DisplayLink Manager to be running at all times. If the app crashes, quits, or fails to launch after a restart, the DisplayLink displays go blank.
More significantly, major macOS updates occasionally break DisplayLink compatibility temporarily. When Apple releases a major macOS update (e.g., Sequoia, Sonoma), the DisplayLink Manager may need an update to maintain compatibility. In some cases, this gap between the macOS release and the DisplayLink driver update is a few days. In others it’s a few weeks.
During this gap, DisplayLink displays may not work. This has happened multiple times across macOS version history and is the most commonly cited frustration from DisplayLink users who otherwise find the technology acceptable.
Synaptics has significantly improved the update cadence in recent years — the transition from kernel extension to app-based architecture in DisplayLink Manager 1.x removed the most fragile compatibility point. But the dependency on a third-party driver that must be manually updated remains a fact of life with DisplayLink on Mac.
Trade-off 6: Lock screen and Apple Watch limitations
DisplayLink has two specific limitations that affect daily workflow:
Lock screen: By default, DisplayLink displays go blank on the macOS lock screen. A separate Login Screen Extension is available from the DisplayLink support page that enables displays on the lock screen — but it requires separate installation and configuration.
Apple Watch unlock: macOS disables Apple Watch unlock when DisplayLink is active, showing the message “Unlocking with Apple Watch is not available while your screen is being shared.” You’ll need to type your password manually instead of using the watch to unlock.
Both are minor inconveniences for most users. For those who rely heavily on Apple Watch unlock, it’s worth knowing upfront.
Which Mac Models Need DisplayLink — and Which Don’t
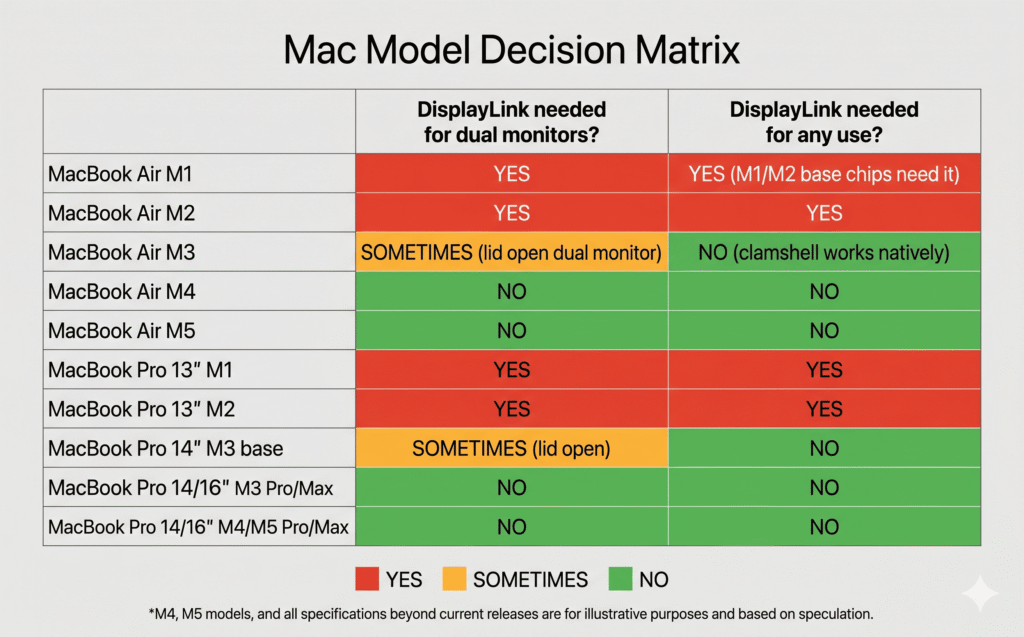
MacBook Air M1 — DisplayLink: Needed for dual monitors
The M1 Air has one hardware display engine for external output. One monitor is possible natively through any dock or hub. A second external monitor is only possible with DisplayLink technology.
If you’re on M1 Air and want two monitors: you need a DisplayLink dock. There’s no alternative that doesn’t involve DisplayLink.
Best DisplayLink docks for M1 Air:
- Plugable UD-6950PDH — most stable macOS compatibility, dual 4K
- TobenONE DisplayLink Triple Monitor Dock — three independent monitors if needed
MacBook Air M2 (13-inch and 15-inch) — DisplayLink: Needed for dual monitors
Identical display limit to M1. One native external display. Second monitor requires DisplayLink.
M2 Air added MagSafe, which frees both USB-C ports for data/display. But the display engine count didn’t change. DisplayLink is the only path to dual monitors with lid open.
Best DisplayLink docks for M2 Air:
- Plugable UD-6950PDH ($150)
- TobenONE DisplayLink Triple ($130)
- WAVLINK USB-C DisplayLink Dock ($100 — budget option)
MacBook Air M3 (13-inch and 15-inch) — DisplayLink: Sometimes
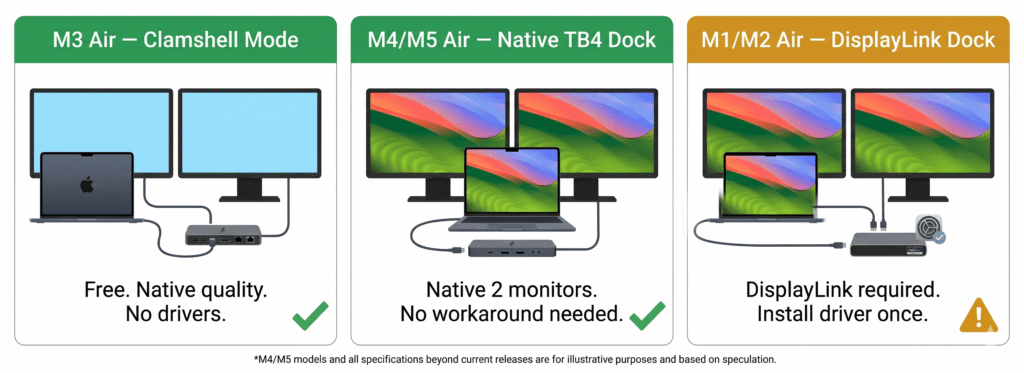
M3 Air introduced a meaningful improvement: with the lid closed (clamshell mode), it can drive two external monitors natively — no DisplayLink needed, no driver, just a Thunderbolt dock and both ports connected to monitors.
When you don’t need DisplayLink: If you’re happy closing the laptop lid and using your Mac as a pure desktop with two external monitors, a Thunderbolt dock handles this cleanly. This requires macOS Sonoma 14.3 or later, an external keyboard and mouse, and the Mac to be connected to power.
When you do need DisplayLink: If you want two external monitors with the MacBook lid open — using all three screens simultaneously (built-in + two external) — DisplayLink is still required. This is a more unusual setup but some users specifically want it.
Best approach for M3 Air: Try the clamshell approach first. It’s cleaner — no driver, no DRM limitations, full image quality. Only install DisplayLink if you specifically need lid-open triple-screen use.
MacBook Air M4 and M5 — DisplayLink: Not needed for dual monitors
M4 Air was the turning point. Two external monitors natively supported, lid open or closed, with any Thunderbolt 4 dock. No DisplayLink, no clamshell requirement, no driver installation.
For the vast majority of MacBook Air M4 and M5 users, DisplayLink is completely unnecessary. A standard Thunderbolt dock handles a two-monitor setup cleanly and natively.
The only scenario where DisplayLink adds value on M4/M5 Air: if you want three or more external monitors. The native limit is two. A dock with DisplayLink technology adds a third and fourth independently.
MacBook Pro 13-inch M1 and M2 — DisplayLink: Needed for dual monitors
The 13-inch MacBook Pro used the base M1 and M2 chips — same one-display limit as the Air models. One native external display, no clamshell workaround (that came with M3). DisplayLink is the only path to dual monitors.
MacBook Pro 14-inch M3 base — DisplayLink: Sometimes
The base M3 14-inch MacBook Pro has the same single-display native limit as the M3 Air, with the same clamshell improvement. It also has only two Thunderbolt ports (unlike the three on M3 Pro/Max models), which affects dock recommendations.
Use the clamshell approach for native dual monitors. Use DisplayLink only if you specifically need lid-open dual or triple monitors.
MacBook Pro 14-inch and 16-inch with M3 Pro, M3 Max, M4 base, M4 Pro, M4 Max, M5 Pro, M5 Max — DisplayLink: Not needed for standard setups
All MacBook Pro models with Pro, Max, or M4+ base chips support two or more external monitors natively. DisplayLink is not needed for standard multi-monitor setups on these machines.
DisplayLink might add value only for extreme multi-monitor setups: if you have an M4 Max (native 4 displays) and want five or six external monitors simultaneously. That’s a niche case, and the DisplayLink CPU overhead at that monitor count becomes significant.
Scenario-by-Scenario Guide: Do You Need DisplayLink?
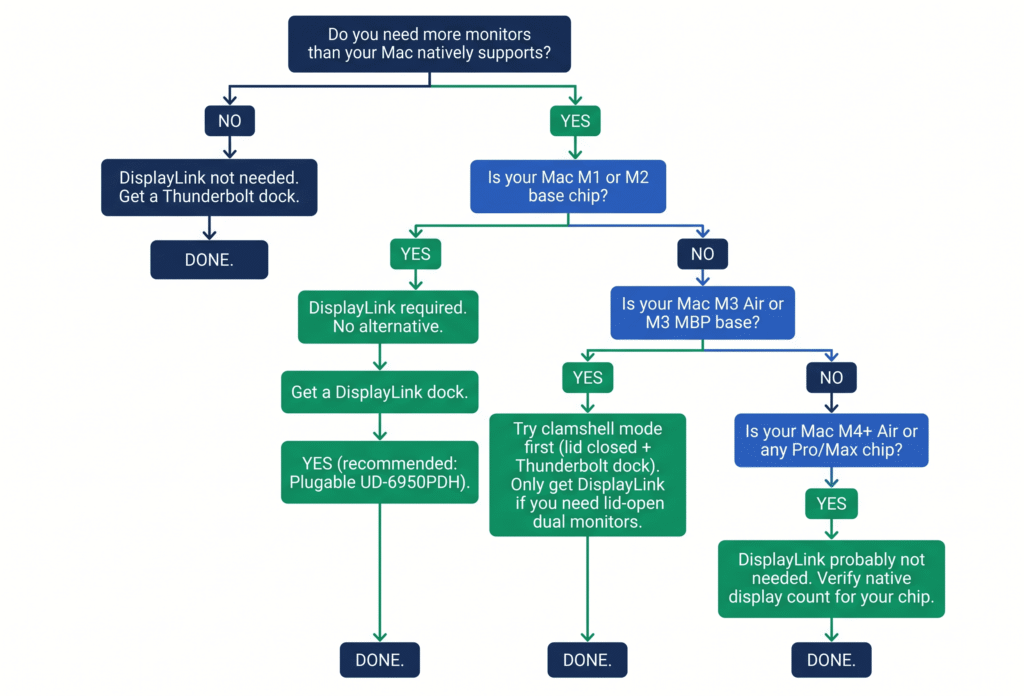
Scenario A: M1 or M2 MacBook Air, want two monitors at a desk
Need DisplayLink? Yes — no alternative.
What to buy: A dock that explicitly has DisplayLink technology. Don’t buy a Thunderbolt dock for this — it won’t give you a second monitor. Specifically look for “DisplayLink” in the dock’s feature list or on the packaging.
Setup process: Install DisplayLink Manager, grant Screen Recording permission, connect the dock, connect both monitors.
What to expect: Second monitor works as a fully independent extended display. Static and light-motion content looks excellent. The DRM streaming limitation applies to the DisplayLink monitor. CPU overhead is minimal for standard productivity work.
Recommended docks:
- Plugable UD-6950PDH — most reliable Mac driver support, dual 4K@60Hz, $150
- TobenONE DisplayLink Triple Monitor Dock — three monitors if needed, $130
Scenario B: M3 MacBook Air, want two monitors at a desk
Need DisplayLink? Only if you want the laptop lid open.
Option 1 — Clamshell mode (no DisplayLink needed): Connect a Thunderbolt dock, plug both monitors into the dock’s outputs, close the MacBook lid. Both monitors appear as independent extended displays. Full native image quality. No driver. No DRM limitation. No CPU overhead. Requires macOS Sonoma 14.3+.
The trade-off: you lose the 13-inch or 15-inch built-in display. You’re working with two external monitors only, and the MacBook acts as a pure desktop machine.
Option 2 — Lid open, three screens total (DisplayLink needed): If you specifically want the built-in display plus two external monitors (three screens total), you need DisplayLink. This is a more unusual requirement — most users working from a desk prefer to close the lid.
Recommended docks:
- Clamshell (no DisplayLink): UGREEN Revodok Max 213 ($130), TobenONE 18-in-2 ($110)
- DisplayLink (lid open): Plugable UD-6950PDH ($150)
Scenario C: M4 or M5 MacBook Air, want two monitors
Need DisplayLink? No.
M4 and M5 Air support two external monitors natively, lid open or closed. A standard Thunderbolt 4 dock handles this completely. No drivers, no DRM limitations, no CPU overhead.
Recommended docks:
- UGREEN Revodok Max 213 ($130) — best value TB4 dock for M4/M5 Air
- TobenONE 18-in-2 ($110) — Mac-specific, plug-and-play, 2.5Gbps Ethernet
Scenario D: M4 or M5 MacBook Air, want three monitors
Need DisplayLink? Yes — for the third monitor.
Native limit is two external displays. The third requires DisplayLink. A dock that combines Thunderbolt (for the two native displays) and DisplayLink (for the third) handles this — or a separate DisplayLink adapter connected to a USB port.
What to buy: A dock with both Thunderbolt connectivity and DisplayLink technology built in, or a Thunderbolt dock plus a separate DisplayLink USB-C adapter for the third monitor.
Scenario E: MacBook Pro M3 Pro, M4 Pro (any screen count within native limits)
Need DisplayLink? No.
M3 Pro natively supports two external displays plus the built-in HDMI port for a third. M4 Pro supports up to three external displays via Thunderbolt 5. All native, hardware-accelerated, no DisplayLink needed.
A Thunderbolt dock connected to the MacBook Pro covers any standard multi-monitor setup for these chips.
Scenario F: MacBook Pro M4 Max or M5 Max, want five or more monitors
Need DisplayLink? Only for the fifth display and beyond.
M4 Max natively supports four external displays plus the built-in display for five total. If you need a sixth or seventh monitor, DisplayLink adds those additional outputs beyond the native limit.
This is a niche use case. At five or six displays, the DisplayLink CPU overhead becomes more significant on the overall system. Testing your specific workflow at this monitor count before committing is recommended.
Scenario G: Video editor or color grader, considering DisplayLink for a second monitor
Need DisplayLink? It depends on your Mac — but use it only for non-critical monitors.
DisplayLink compression reduces color accuracy. If you’re doing professional color grading on a DaVinci Resolve timeline or retouching RAW photos in Capture One, the DisplayLink monitor should not be your primary working monitor. Use a native Thunderbolt-connected display for color work and put reference materials, chat apps, or timelines on the DisplayLink display.
If you have an M1 or M2 Air and DisplayLink is your only option for a second screen in a photo editing workflow, the DisplayLink display works for Lightroom library view, catalog browsing, and tool panels — just not for the color-critical editing canvas.
Scenario H: Developer who scrolls through large codebases all day
Caution warranted. Several developers have reported that DisplayLink displays feel noticeably less smooth for scrolling through large syntax-highlighted codebases than native displays. The compression system updates efficiently for static content but can lag slightly behind rapid scrolling with frequent color changes (which is what syntax highlighting produces during fast scrolling).
If you scroll heavily through large files in VS Code, Xcode, or JetBrains IDEs, evaluate DisplayLink with your actual workflow before committing to it as your primary secondary monitor.
Scenario I: Watching Netflix or streaming on a second monitor
DisplayLink is the wrong tool here. DRM-protected streaming services (Netflix, Disney+, Apple TV+, Amazon Prime Video, Hulu) display a black screen on DisplayLink monitors. This is a macOS content protection behavior and cannot be bypassed.
If watching streaming video on a second monitor is a core part of your setup, you need a native display output for that monitor — either through a Thunderbolt dock (on M3+) or through the MacBook’s built-in HDMI port.
DisplayLink Alternatives — When DisplayLink Isn’t the Right Answer
Alternative 1: Clamshell mode (M3 Air, M3 MacBook Pro base)
The cleanest alternative for M3 base chip Macs. Close the laptop lid, connect two monitors through a Thunderbolt dock, and macOS reassigns the display engine that was serving the built-in screen to drive the second external monitor.
Advantages over DisplayLink: Native image quality, no driver required, no DRM limitations, no CPU overhead, works immediately after reconnecting the dock.
Disadvantage: You lose the built-in display. You work with only the two external monitors.
Requirements: macOS Sonoma 14.3 or later, external keyboard and mouse, Mac plugged into power, a Thunderbolt or USB-C dock that supports dual video output.
Alternative 2: Upgrade to M4 or M5 base chip (for Air users)
If you’re on M1 or M2 Air and consistently frustrated by the one-display limit, the cleanest long-term solution is upgrading to M4 Air. Two external monitors natively, no DisplayLink, no clamshell, no driver dependency.
This isn’t advice to spend money unnecessarily — if DisplayLink works fine for your workflow, continue using it. But if you’ve been fighting DisplayLink driver updates or the DRM limitation is affecting your daily use, the M4 Air is the genuine fix.
Alternative 3: Use the built-in HDMI port alongside a dock (MacBook Pro 14/16-inch)
MacBook Pro models have a built-in HDMI port that’s completely independent from the Thunderbolt outputs. Running one monitor through the HDMI port and additional monitors through the Thunderbolt dock gives you three screens without any DisplayLink dependency.
This is frequently overlooked. An M3 Pro 14-inch can run: two monitors through the Thunderbolt dock + one through the built-in HDMI + the built-in display = four screens total, with zero DisplayLink.
Alternative 4: A DisplayLink USB adapter (without replacing the dock)
If you already have a Thunderbolt dock that you’re happy with, you don’t need to replace it to add DisplayLink capability. Plugable, StarTech, and others make standalone DisplayLink USB adapters — small devices that plug into a USB-A or USB-C port and output HDMI or DisplayPort for one additional monitor.
This is the lowest-cost way to add one DisplayLink monitor to an existing setup. The adapter costs $40–$70 and connects to any available USB port on your Mac or dock. Useful for adding a third monitor on M3/M4 Air or a fifth monitor on a Mac that has already maxed its native display count.
DisplayLink Chip Generations — Does the Chip Version Matter?
Not all DisplayLink chips perform equally. Synaptics has released several generations of DisplayLink chips, and the chip inside your dock determines the maximum resolution and refresh rate of the DisplayLink displays.
| DisplayLink Chip | Max Resolution | Notes |
|---|---|---|
| DL-3xxx | 1080p@60Hz or 2560×1440@60Hz | Older generation — avoid for modern 4K setups |
| DL-5xxx | 4K@30Hz | Common in mid-range docks — adequate for static work |
| DL-6xxx | 4K@60Hz | Current mainstream standard — recommended minimum |
| DL-7000 | 4K@120Hz | Latest generation — best for M4/M5 Macs |
When choosing a DisplayLink dock, look for the chip generation in the spec sheet. A dock with a DL-3xxx chip will not deliver 4K@60Hz regardless of what the listing claims. Verify the chip generation if smooth 4K output matters to you. Plugable and CalDigit both publish the specific DisplayLink chip inside each of their products.
Setting Up DisplayLink Correctly: Common Mistakes
Mistake 1: Buying a regular Thunderbolt dock expecting DisplayLink functionality
A Thunderbolt dock does not include DisplayLink technology unless the listing explicitly says so. Thunderbolt docks and DisplayLink docks are different products. The CalDigit TS4, for example, is a Thunderbolt dock — it does not have DisplayLink and will not give an M1/M2 Air a second monitor.
If you need DisplayLink, the dock’s product page must specifically mention DisplayLink, InstantView, or reference the DisplayLink Manager software.
Mistake 2: Skipping the Screen Recording permission
The most common installation issue. Without Screen Recording permission granted to DisplayLink Manager, the second monitor shows nothing. This must be enabled in System Settings → Privacy & Security → Screen Recording.
The permission prompt does not always appear automatically. If DisplayLink Manager is installed but the display isn’t working, check this setting first.
Mistake 3: Not setting DisplayLink Manager to launch at login
Without auto-launch enabled, DisplayLink Manager doesn’t start after a Mac restart. The second monitor shows nothing until you manually open the app. Enable auto-launch in DisplayLink Manager’s settings immediately after installation.
Mistake 4: Using DisplayLink for color-critical work
DisplayLink compression affects color accuracy. Don’t use a DisplayLink monitor as the primary display for photo editing, video color grading, or any work where precise color representation matters. Use it for reference material, secondary tools, or communication apps instead.
Mistake 5: Running multiple DisplayLink displays on an M1 base chip under heavy load
One DisplayLink display on M1 is manageable. Two or three DisplayLink displays simultaneously on an M1 base chip creates significant CPU overhead — 30–50% or more under active use. This can cause thermal throttling, reduced system performance, and an unpleasant experience overall. On base-chip Macs, limit DisplayLink to one additional display where possible.
Recommended DisplayLink Docks for Mac
Best overall: Plugable UD-6950PDH — $150
Dual 4K@60Hz HDMI outputs, 96W Power Delivery, 4× USB-A, 1× USB-C, Gigabit Ethernet, SD/microSD card readers. Uses the DL-6xxx chip for 4K@60Hz support. Plugable actively tests their DisplayLink docks against macOS releases and publishes compatibility notes before and after major macOS updates. The best choice for M1/M2 Air users who need reliable dual-monitor support.
Best for three monitors: TobenONE DisplayLink Triple Monitor Dock — $130
Three HDMI 4K@60Hz outputs driven by DisplayLink, plus additional USB and Ethernet ports. Works on all Mac chips including M1 and M2 base. Good option if three external monitors are needed on a base-chip Mac.
Budget option: WAVLINK USB-C DisplayLink Dock — $100
Dual HDMI 4K@30Hz. Uses an older DisplayLink chip generation, so 4K output is limited to 30Hz rather than 60Hz. For productivity use at 4K@30Hz the difference is minimal — text is sharp and static content looks fine. Not recommended for smooth video playback or motion-heavy work.
For adding one extra monitor to existing setup: Plugable USB-C DisplayLink Adapter — $45–$65
A small USB-C adapter with a single HDMI or DisplayPort output driven by DisplayLink. No power supply needed — bus-powered from the USB port. Perfect for adding a third monitor to an M3/M4 Air that already has a Thunderbolt dock handling two monitors. Works with USB-A to USB-C adapter if needed.
Best for Mac Pro or high display count: CalDigit Element Hub + DisplayLink Adapter combination
For users who need the maximum Thunderbolt bandwidth alongside DisplayLink capabilities, running a CalDigit Element Hub or TS4 for the native Thunderbolt displays and adding a separate DisplayLink adapter for overflow monitors is the most stable approach. Keeps high-bandwidth Thunderbolt functions (fast NVMe, primary displays) on the native path, and uses DisplayLink only for secondary monitoring.
FAQ
Does DisplayLink work with all macOS versions?
DisplayLink Manager supports macOS Big Sur 11.0 through the latest macOS Sequoia. After major macOS updates, a DisplayLink Manager update may be needed. Synaptics typically releases updates within a few days to a few weeks of major macOS releases. Check the Synaptics download page after any major macOS update before assuming DisplayLink is broken.
Will DisplayLink slow down my Mac noticeably?
For standard productivity use on M1/M2 Macs with one DisplayLink display, the overhead is 5–15% and is not perceptible during typical work. For heavy-motion content, intense scrolling through large codebases, or multiple DisplayLink displays simultaneously, the overhead becomes more noticeable. Test your specific workflow if you’re concerned.
Can I use DisplayLink and a native Thunderbolt display simultaneously?
Yes. This is actually the recommended setup for most users. Native Thunderbolt handles the primary work display with full image quality and zero overhead. DisplayLink handles a secondary reference or communication display. Both appear as independent extended screens in System Settings → Displays.
Does DisplayLink work in clamshell mode?
Partially. Basic DisplayLink functionality works in clamshell mode. The Login Screen Extension (available from the DisplayLink support page) is needed to show displays on the lock screen in clamshell. Apple Watch unlock does not work when DisplayLink is active regardless of lid position.
Can I rotate a DisplayLink display on Mac?
Yes — but not through the standard macOS Displays settings. Rotation for DisplayLink monitors on Apple Silicon Macs is done within the DisplayLink Manager application itself, not through System Settings. Look for the rotation option in the DisplayLink Manager window.
Will DisplayLink affect my Mac’s battery life when on battery power?
Yes. Running a DisplayLink display adds CPU overhead, which increases power consumption. Expect 15–25% faster battery drain when running a DisplayLink display compared to the same setup without it. For a wired desk setup this is irrelevant. For mobile or battery-powered use, it’s worth considering.
My DisplayLink display stopped working after a macOS update. What do I do?
First: go to the Synaptics DisplayLink download page and check if a new version of DisplayLink Manager is available. Install it and restart. Second: verify Screen Recording permission is still granted (macOS occasionally resets app permissions after updates). Third: unplug and replug the dock cable. This resolves the vast majority of post-update issues.
The Bottom Line
DisplayLink is not magic, and it’s not a scam. It’s a specific engineering solution to a specific hardware constraint, with real trade-offs that you should understand before deploying it.
You need DisplayLink if: You have an M1 or M2 Mac and want two or more external monitors, or you have an M3/M4+ Mac and want more monitors than the chip natively supports.
You don’t need DisplayLink if: You have M4 or M5 Air and want two monitors, you have any MacBook Pro with M3 Pro, M4, or M5 chips (for standard two to three monitor setups), or you have an M3 Mac and are willing to use clamshell mode.
Use DisplayLink with caution if: You do color-critical work, you need smooth high-framerate motion on the secondary display, you rely on DRM streaming on multiple monitors, or you’re running a base-chip Mac with multiple DisplayLink displays simultaneously.
When used for the right purpose — giving M1/M2 base Macs a genuinely usable second monitor for productivity work — DisplayLink is one of the most useful technologies in the Mac accessory ecosystem. When pressed into service for workloads it wasn’t designed for, it creates problems that native Thunderbolt output doesn’t have.
Match the tool to the task, and it serves you well.
All specifications in this article are based on Synaptics DisplayLink official documentation, Apple’s published chip specifications, and verified community reports. DisplayLink Manager version numbers and compatibility details verified May 2026.