If you’re on an Apple Silicon Mac (M1 / M2 / M3 / M4) and you’re trying to run two external monitors, you’ve probably already discovered the uncomfortable truth: the answer is rarely “buy any hub with two HDMI ports.”
Mac dual-monitor setups fail for a few repeatable reasons—most of them predictable once you understand how macOS handles external displays and what your specific chip can (and cannot) do.
This guide explains what actually works, why some solutions fail, and how to choose the correct path without guessing. It’s written for real setups: home offices, dual 4K desks, clamshell mode, and mixed monitor combos.
The first thing to know: “two monitors” can mean three different things
Before we talk hardware, we need to be precise about the goal. People say “dual monitors” but mean different outcomes:
- Two mirrored displays
Both monitors show the same image. This is common when macOS won’t (or can’t) create independent display streams. - Two extended displays
Each monitor is its own desktop space. This is what most people want. - One extended + one via software (DisplayLink)
macOS provides one native external display, and the second is generated through a driver-based solution.
Most frustration happens when someone expects #2 but ends up with #1, or gets #3 without realizing the trade-offs.
Quick compatibility map (the rule that prevents 80% of bad purchases)
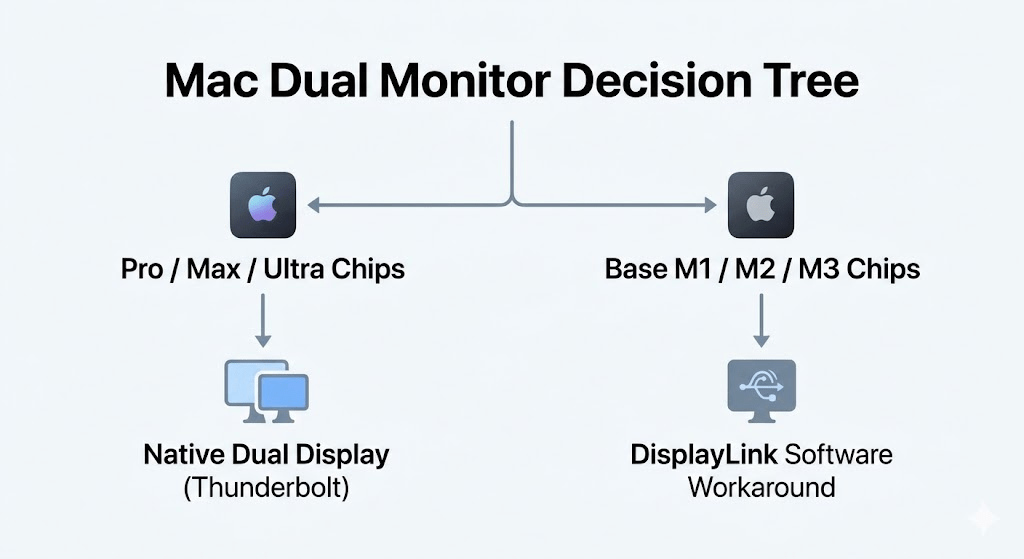
Apple Silicon Macs fall into two broad categories:
A) Base chips (most MacBook Airs, some entry MacBook Pros)
These are the models that historically caused the “only one external display” wall.
- Often limited in native external display count (model-dependent).
- Dual external displays may require a specific mode (e.g., clamshell) or a software workaround.
B) Pro / Max / Ultra chips
These are far more flexible for multi-display, typically supporting multiple externals natively.
- Dual external displays usually work with the right dock/cables.
- Your bottlenecks are more about bandwidth, refresh rate, and port layout than hard OS limits.
The practical takeaway:
If you’re on a base chip and your Mac only supports one external display natively, no “two-HDMI hub” can magically create a second native display. If you want two extended externals anyway, you’ll be looking at DisplayLink (or model-specific exceptions).
Why Mac behaves differently than Windows
A lot of dock marketing assumes Windows behavior. macOS is different in a few key ways:
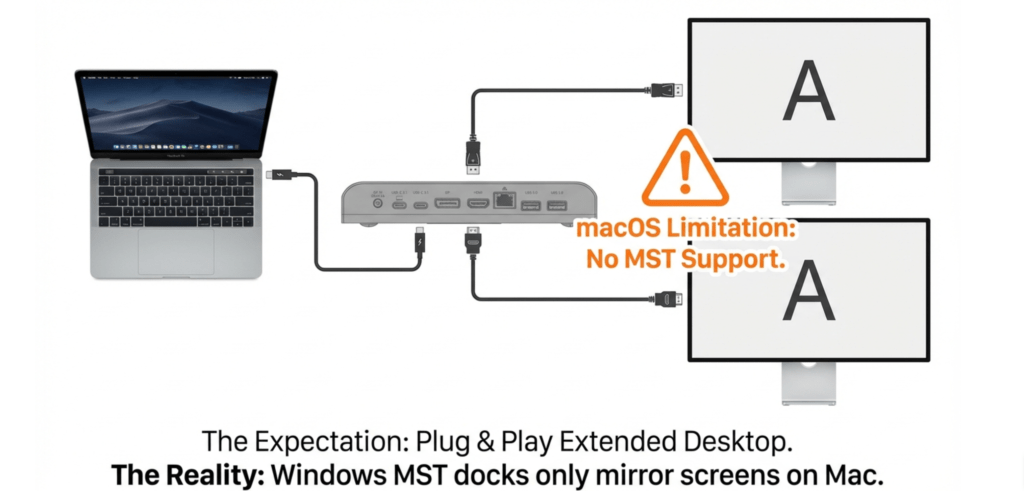
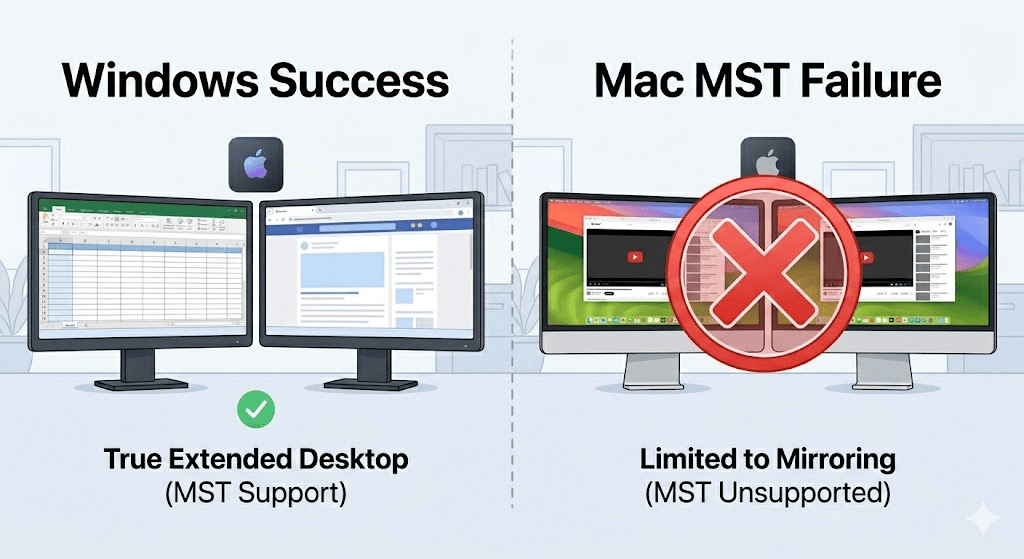
1) macOS does not treat MST the same way
On many Windows laptops, MST (Multi-Stream Transport) can split a single video connection into multiple independent displays. On macOS, MST is not generally used for creating multiple extended displays in the same “plug and extend” way most Windows users expect.
So a hub/dock that achieves dual displays via MST on Windows may deliver only mirroring (or one active display) on a Mac.
2) Port count is not display count
A device can have two HDMI ports and still only carry one display stream. Those extra ports can be:
- Alternate outputs for convenience (choose HDMI1 or HDMI2)
- Duplicated outputs that mirror the same signal
- Dependent on OS support for splitting the stream
3) Base Apple Silicon models may have hard native limits
Some models can output only one external display natively. In those cases, the “second display” must come from a separate mechanism (DisplayLink) rather than the GPU’s native pipelines.
The three real ways to get dual external monitors on an M-series Mac
Path 1: Native multi-display (best when your Mac supports it)
This is the cleanest solution: no special drivers for displays.
It requires:
- A Mac model/chip that supports more than one external display natively
- A dock/adapter that can pass those display streams properly (often Thunderbolt)
- Cables that support your target resolution/refresh rate
Who typically succeeds with this path:
People on Pro/Max/Ultra chips using a good Thunderbolt dock, or people on base models that specifically support two externals under certain conditions.
Common real-world outcome:
Stable dual monitors, low latency, better support for color/DRM scenarios, fewer “weird” wake/sleep behaviors.
Path 2: One native + one software display (DisplayLink)
DisplayLink creates additional displays using a driver and compression over USB data. In practice, this means your second monitor is not coming from the GPU’s standard display pipeline.
Why people choose it:
Because it’s the most common reliable workaround for base Apple Silicon models that otherwise won’t do dual extended externals.
What’s good about it:
- Dual extended displays become possible on models that wouldn’t allow it natively.
- Works with many common office use cases (docs, web, spreadsheets, Slack).

Limitations you must understand:
- Requires drivers (you’re not “plug-and-play” in the purest sense).
- Some content protection (DRM) scenarios can be awkward depending on apps and workflows.
- Latency/CPU overhead can be higher than native—usually fine for productivity, less ideal for competitive gaming or highly latency-sensitive work.
- Color-critical workflows may prefer native paths.
What real users report most often:
They’re happy once it’s set up—especially for office work—but they wish they had known about the driver requirement and the “this is not native GPU output” nature from day one.
Path 3: Two monitors, but not in the way you expect (mirroring / one active)
This is the “what went wrong” path. It often happens when:
- The Mac supports only one native external display
- The hub relies on MST splitting that macOS won’t use for extended mode
- The device’s two video ports are not independent streams
If you’re here, it’s not that you did something stupid. You likely bought a product designed around Windows assumptions, or you were not told the key Mac constraints.
A realistic story pattern (what people do, and what they learn)
Here are a few “composite” scenarios—these are not one person’s exact story, but patterns that show up constantly:
Scenario A: “Two HDMI ports, one monitor works”
A MacBook Air user buys a compact USB-C hub with dual HDMI. One monitor works, the second mirrors or stays dark.
What’s happening:
- The hub is not producing two independent streams.
- macOS (and/or the base chip) is limiting native output.
Fix:
- If the Mac natively supports only one external display: DisplayLink is the usual route.
- If the Mac supports two: move to a Thunderbolt solution that supports proper multi-stream output as macOS expects.
Scenario B: “It works… but only at 30Hz”
User gets two displays working but 4K feels sluggish, mouse motion looks “heavy,” or scrolling is choppy.
What’s happening:
- HDMI version / bandwidth limitation.
- Hub shares bandwidth.
- Cable not rated for the target mode.
- Dock is outputting 4K 30Hz due to an internal chipset limit.
Fix:
- Choose Thunderbolt for dual 4K 60Hz.
- Verify HDMI 2.0/2.1 or DisplayPort version support end-to-end.
- Confirm you’re not running through a bandwidth-sharing bottleneck.
Scenario C: “Dual monitors work, but wake-from-sleep is flaky”
User has a desk setup that mostly works, but after sleep one monitor doesn’t wake, or windows rearrange.
What’s happening:
- Dock firmware quirks
- macOS sleep/display handshake complexity
- Sometimes cable or monitor input auto-switch settings
Fix:
- Update dock firmware and macOS.
- Lock monitor input selection if possible.
- Test alternate ports/cables.
- Consider a higher-tier dock if the problem is persistent.

The technical core: what you must check to know whether dual monitors will work
1) Your Mac’s display support (native external count)
This is the first gate. If your model only supports one external display natively, the only “normal” way to get two extended externals is DisplayLink (or a model-specific supported exception).
Practical advice:
Don’t guess from the number of USB-C ports. Look at the actual supported external display count for your model.
2) Your port type: USB-C vs Thunderbolt
All Thunderbolt ports use the USB-C connector shape, but not all USB-C ports are Thunderbolt.
For dual high-resolution displays, Thunderbolt often:
- simplifies compatibility,
- provides bandwidth headroom,
- improves stability.
3) Your target monitor setup (resolution + refresh rate)
“Two monitors” isn’t one requirement; it’s a spectrum:
- 2 × 1080p 60Hz (easy)
- 2 × 1440p (moderate)
- 2 × 4K 60Hz (demanding)
- 1 × ultrawide + 1 × 4K (can be demanding)
- 120Hz/144Hz (more demanding)
Bandwidth climbs quickly as you move from 1080p to 4K and from 60Hz to 120Hz.
4) Your dock/hub’s display method: Native vs DisplayLink
This is the second gate after your Mac’s own capability.
- Native docks rely on your Mac’s display pipelines.
- DisplayLink docks add displays via USB data + driver.
If your Mac can’t natively do two externals, a “native” dock won’t fix that.
5) Cable quality and standards
Cables are a silent failure source. You can have:
- a great dock,
- a capable Mac,
- good monitors,
…and still get 4K 30Hz if your cable is the bottleneck.
For dual 4K 60Hz, you want to be deliberate about:
- using a certified Thunderbolt cable for TB docks,
- using display cables that support the standard required by your monitors.
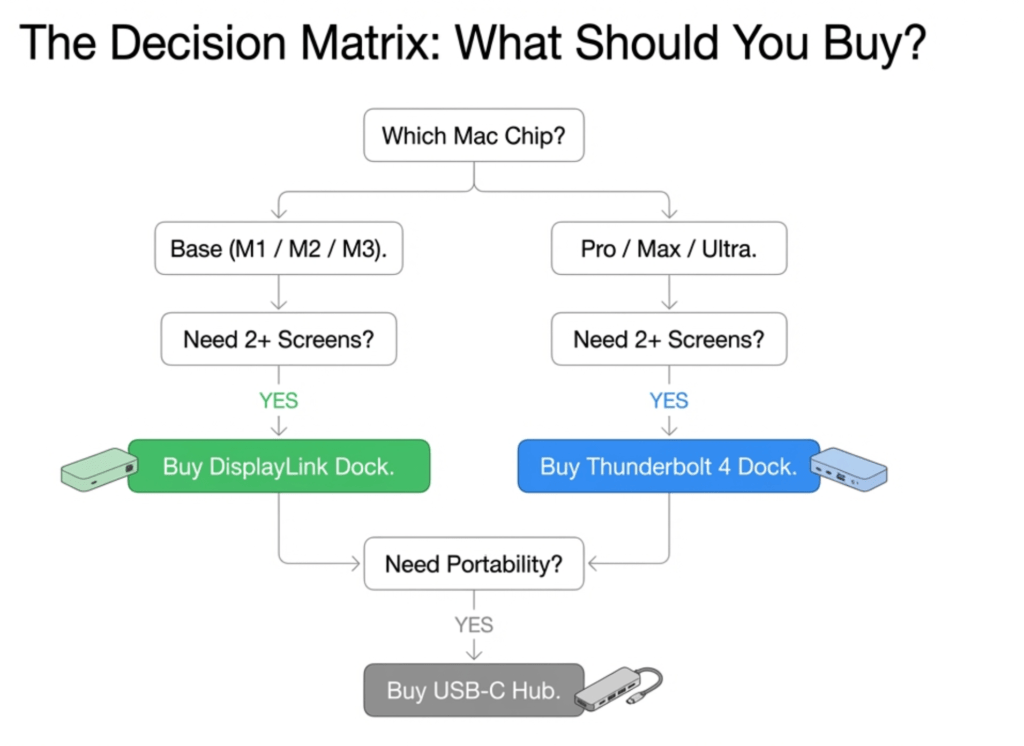
Recommended decision tree (Mac-first)
Use this flow to avoid the common trap.
Step 1: Do you need two extended external monitors?
- If you only need mirroring, almost anything can work.
- If you need extended: continue.
Step 2: Does your Mac support two external displays natively?
- Yes: Prefer a Thunderbolt dock for reliability, especially for 4K.
- No / not sure: Assume you need DisplayLink if you want two externals.
Step 3: What’s your resolution/refresh target?
- 2 × 1080p / 2 × 1440p: More solutions will work.
- 2 × 4K 60Hz: Strongly prefer Thunderbolt (native) or a well-reviewed DisplayLink dock if your Mac needs it.
Step 4: Are you OK installing drivers?
- Yes: DisplayLink becomes a viable plan.
- No: You must stay within native display limits (or change the monitor plan).
Step 5: Is this for productivity or latency-sensitive work?
- Productivity: DisplayLink usually fine.
- Latency-sensitive / gaming / color-critical: Try to stay native when possible.
How to build a Mac dual-monitor setup that stays stable
1) Keep the chain simple
The more adapters you stack (USB-C → HDMI adapter → HDMI coupler → monitor), the more points of failure.
Prefer:
- dock → direct HDMI/DP to monitor, or
- dock → USB-C/Thunderbolt to monitor (if the monitor supports it cleanly)
2) Prefer DisplayPort when practical
On many setups, DisplayPort can be more predictable for high-res/high-refresh. HDMI can still be great, but cheap HDMI chipsets are a common reason for 4K 30Hz caps.
3) Make clamshell behavior explicit
If you plan to use clamshell mode:
- power must be connected
- external keyboard/mouse needed (or at least Bluetooth devices available)
- some people see different stability behavior between “lid open” and “lid closed” modes
4) Treat sleep/wake as a test case, not an afterthought
When you evaluate a dock, test:
- cold boot
- hot plug/unplug
- sleep overnight
- waking both monitors consistently
If a setup survives those, it’s usually “workday stable.”
5) Keep macOS and dock firmware current
Dock firmware updates are boring until they fix exactly the thing that annoys you.
Troubleshooting checklist (when you have one monitor or mirroring)
If you’re stuck with one monitor or mirroring, run this in order:
- Confirm both monitors work individually (test one at a time).
- Swap cables (a single bad/low-spec cable can create “only 30Hz” or “no signal”).
- Test the dock on another computer if possible (to separate dock failure from Mac limitation).
- Check whether your dock is relying on MST for multi-display. If yes, macOS likely won’t extend the way you expect.
- Check if your Mac model natively supports two externals. If it doesn’t, stop troubleshooting the hub—switch strategy (DisplayLink or different plan).
- If using DisplayLink:
- confirm the driver is installed,
- confirm permissions are granted as required,
- reboot after first install,
- test again.
This checklist feels basic, but it catches the common failures quickly.
Practical recommendations by user type (not brand-specific)
If you have a base-chip MacBook and you want two externals
- Decide whether you accept DisplayLink.
- If yes: choose a DisplayLink dock and plan for driver install.
- If no: accept one external, or use one external + iPad Sidecar (different category), or change your workflow expectations.
If you have a Pro/Max/Ultra Mac and want dual 4K 60Hz
- Thunderbolt dock is typically the cleanest path.
- Be strict about cables and monitor input standards.
- Avoid “cheap dual HDMI hubs” if you care about stable 60Hz.
If you want the simplest desk setup for office work
- One high-quality external monitor + a simple hub is often enough.
- If you really need two screens, decide early between native support and DisplayLink.
The honest bottom line
Dual monitors on Apple Silicon Macs are absolutely achievable, but the “correct” solution depends on one fundamental constraint:
Your Mac’s native external display support.
Once you know that, everything becomes straightforward:
- If your Mac supports two externals natively, choose a good Thunderbolt path and be careful about cables/standards.
- If your Mac supports only one external natively and you need two extended monitors, DisplayLink is the common workaround—with real trade-offs you should understand before buying.
The biggest win is not finding a magic dock.
It’s eliminating guesswork and choosing the path that matches the way macOS actually works.
If you want, tell me your exact Mac model (e.g., “MacBook Air M3, two 4K monitors, lid closed”), and I’ll map the cleanest solution path (native vs DisplayLink) and the key specs to look for—without turning it into a product list.